Store designing was just a luxury element a few years back, but now it’s a need for every merchant!
When you look around, you may find many people still do not trust online shopping. One of the major reasons is the store design. Suppose you land on an eCommerce store that is full of pop-ups, blurry pictures, and messy text. Would you like to buy anything from there? I think you won’t.
So, what makes shoppers feel confident about your store and your products? When you are selling online, your storefront is all your shoppers see and interact with. For new eCommerce stores, it’s very important to make a professional storefront to build the trust of the customers.
We are here with the Shopify theme customization tutorial to help you customize the Shopify theme starting from adding a theme to your store to publishing your theme.
So, let’s begin!
Shopify Theme Customization
Shopify theme customization is the best way to design your online store even when you do not have any coding knowledge. Themes save you from designing your Shopify eCommerce store from scratch which takes lots of time, effort, and money.
Shopify themes come with a basic look that an eCommerce store with a niche should have. After you select a theme, you need to personalize it according to your storefront requirements.
But the first step is choosing the right theme for your Shopify store. Let’s see how to pick the best theme for your online store based on your eCommerce needs.
Selecting a suitable Shopify Theme
Before you take yourself deep into customizing your store design, you should first be sure of the theme you’ve selected is the right theme for your Shopify store. Because, if you realize that the theme you have selected for further customization is not the best match for your eCommerce business, all your efforts will get wasted.
Therefore, you should select your Shopify theme wisely before you start with the Shopify Theme Customization checklist. If you are not sure which theme to choose, you can check the best Shopify 2.0 themes to get more ideas.
Basically, you should ask some questions while deciding the best theme for your Shopify store:
- whether the theme is designed for your eCommerce niche?
- whether the theme is suitable for your catalog size?
- whether you like the theme layout?
- whether the theme offers the required features?
- whether the theme offers customization?
- And lastly, whether the theme comes within your budget.?
Once you’ve selected a suitable theme for your store, now, we’ll see how to add a theme to your Shopify store.
How to Add a Theme to your Shopify Store
Let’s see the process step-by-step:
- Step 1: Log in to your Shopify Admin.
- Step 2: Go to Online store > Themes.
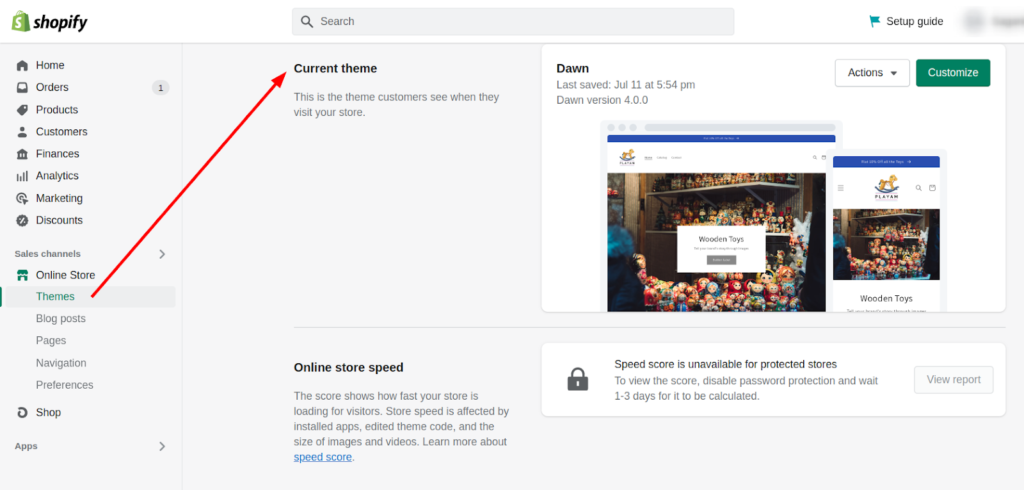
You can find the Dawn theme as your current theme. But you can easily add another theme and replace the default one.
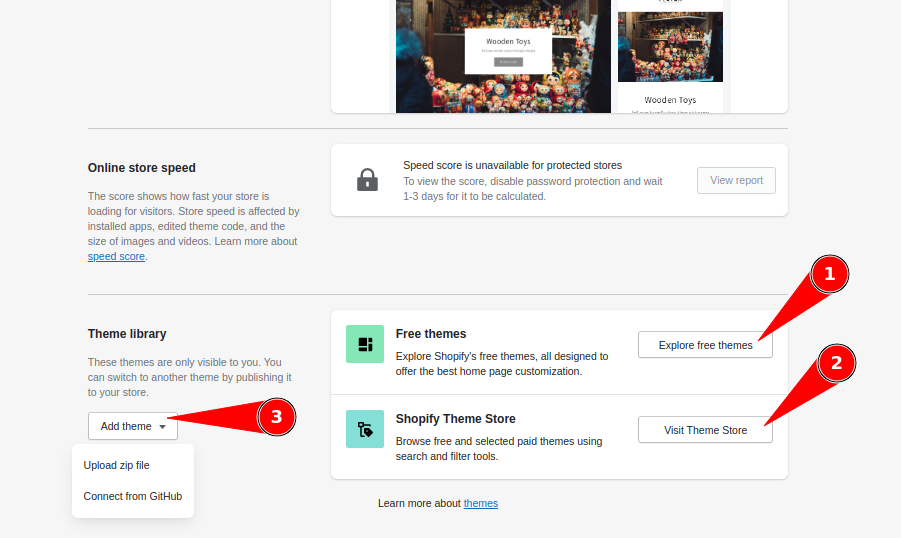
- Step 3: In the theme library, (1) click on Explore free themes if you want to add Shopify free themes to your store.
Or (2) click go to the Shopify theme store [1] if you want to add premium Shopify themes to your store.
Or (3) click on Add theme to upload the theme file or add a theme from GitHub.
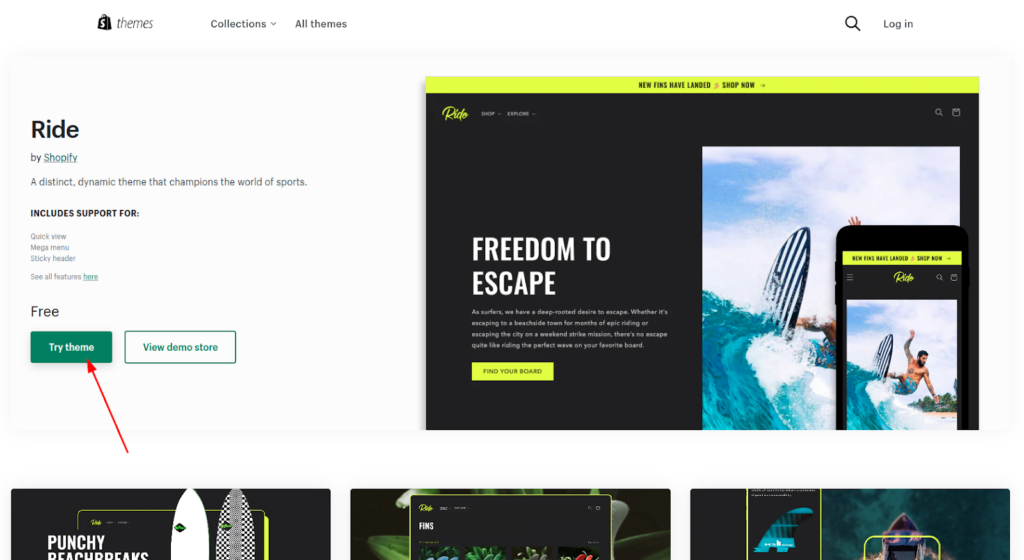
Suppose, you are browsing the themes in the Shopify theme store and you liked a theme for your website, you can add it by clicking on the Try theme button.
That’s it!! Once you successfully added the theme to your store you can find it listed in the theme library section as shown below:
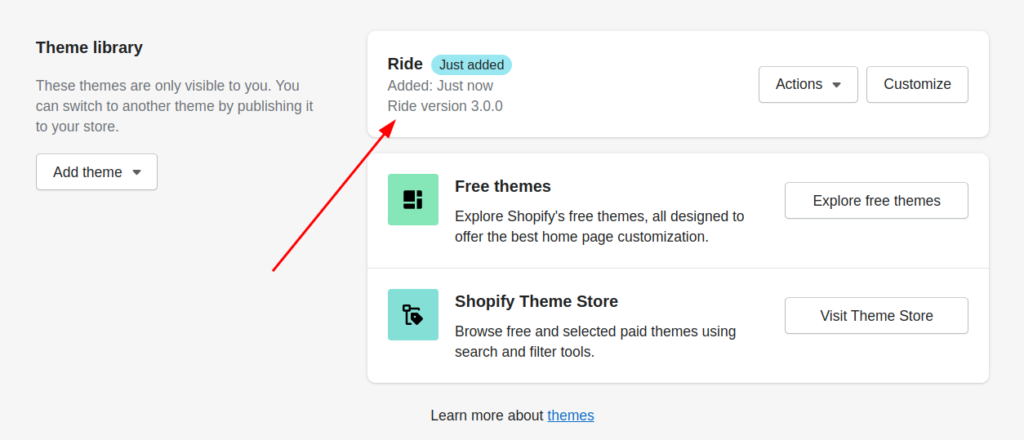
Now that, you have added a suitable theme for your Shopify website, click on the Customize button beside the theme. This will open the theme editor where you can customize your Shopify theme templates.
The Shopify theme editor is the place where you can customize Shopify themes and give a new face to your online store. It offers a simple drag-and-drop feature for you to modify the templates as per your needs.
Let’s get started with Shopify theme customization:
1. Customize the Header
So the first thing that comes, of course, setting up the theme header. The Header section of your Shopify website should consist of the elements as below:
- Business Logo
- Search field
- Login field
- Announcement bar (optional)
- Language or Currency selector (optional)
Most of the above elements are already added in the Shopify themes. You just need to personalize them as per your needs. Let’s set up the header elements one by one!
Add your business logo
Adding your business logo means giving identity to your online store. By default, the theme keeps the logo from the brand details of your store. But, if you haven’t added your brand details to your store from Shopify settings, then you can also add your business logo from the theme editor.
Here are the steps to add a logo to your Shopify theme:
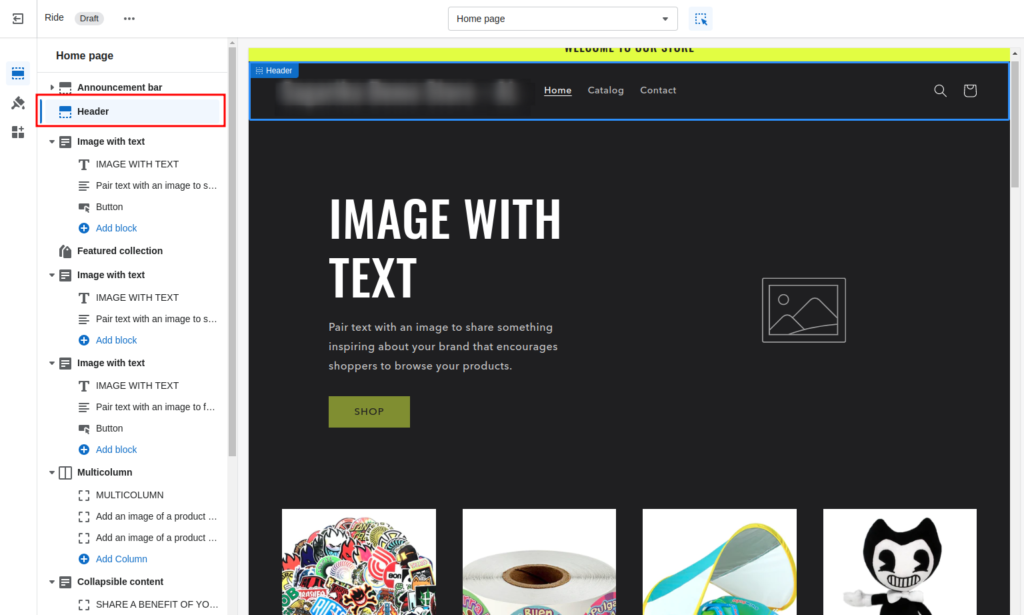
- Step 1: In the theme editor, click on the Header section.
- Step 2: In the Header section, (1) click on the Edit brand link to add the default logo for your store.

Or (2) click on the Change and Select image to add the logo directly to the theme.
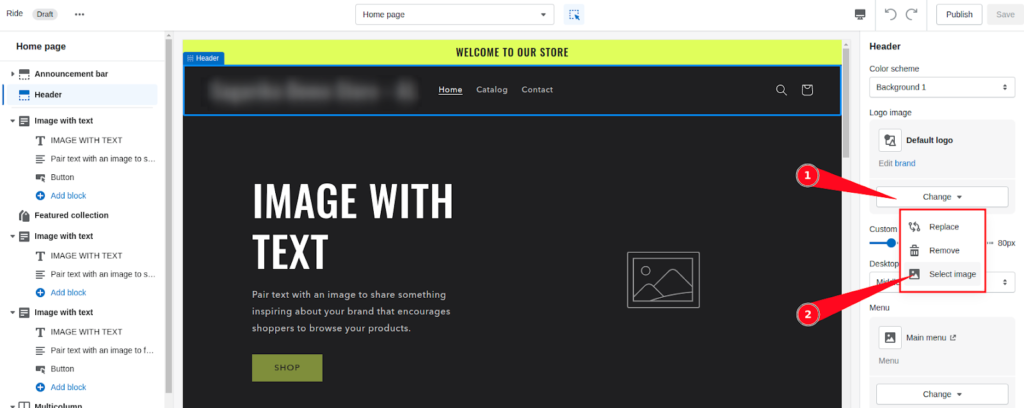
Both methods will help you display the latest business logo image in your store.
- Step 3: Next, adjust the size of your logo using the Custom logo width option (if required).
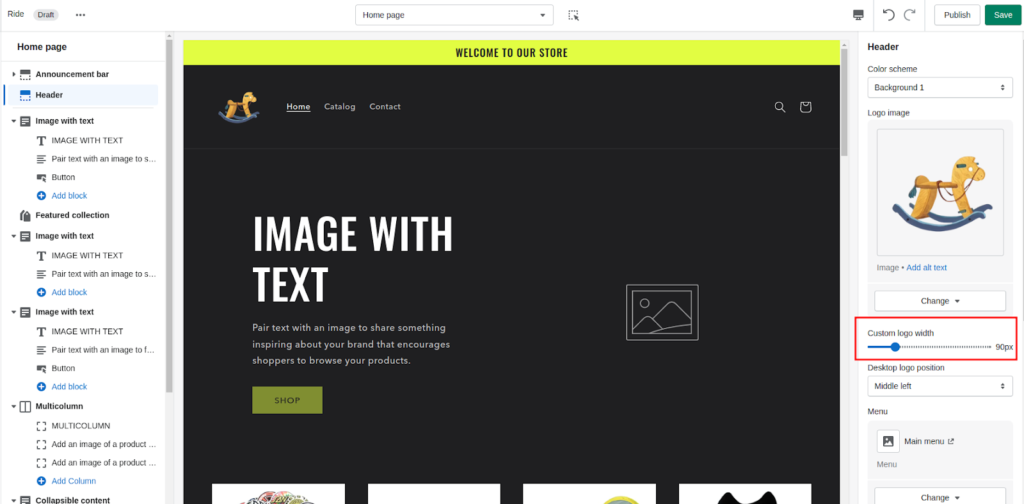
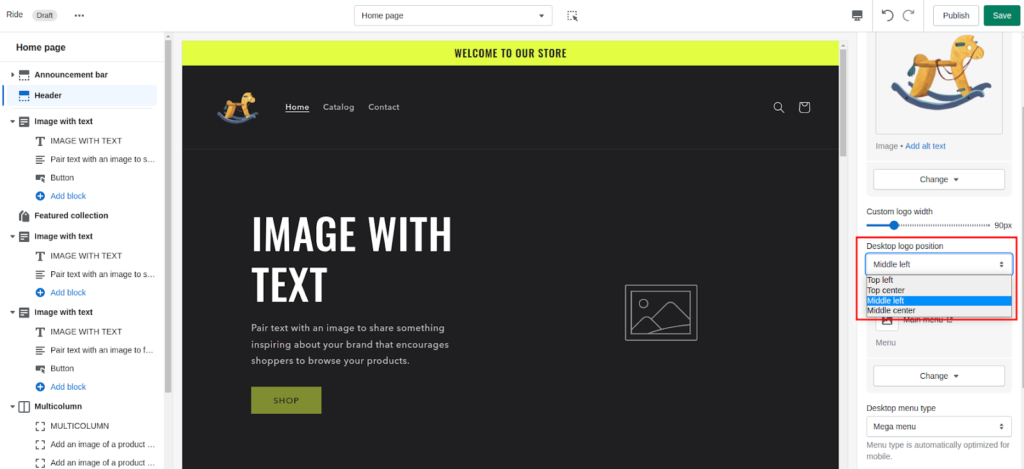
- Step 4: Select the Desktop logo position to choose where you want to place the logo in the desktop view.
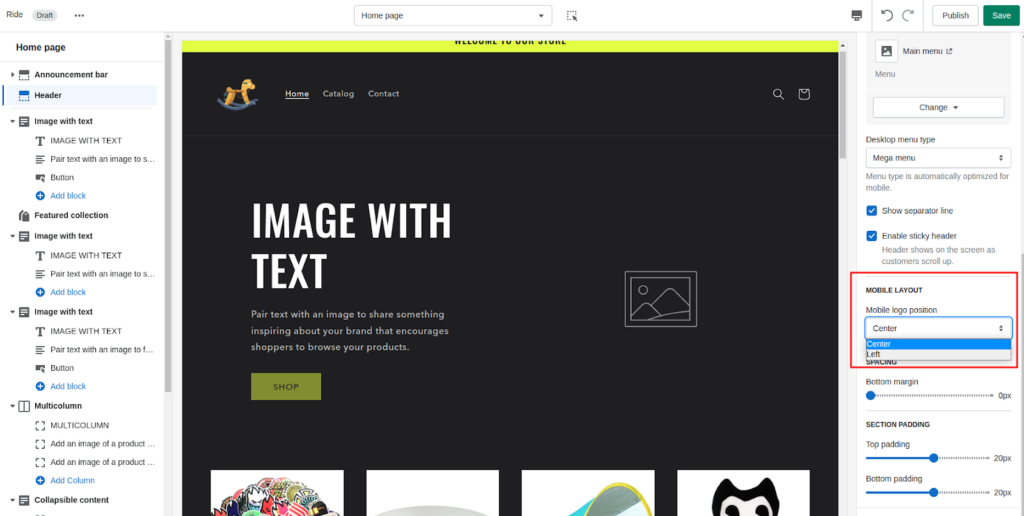
Step 5: Lastly, scroll down to the Mobile logo position and choose where you want to place the logo in the mobile view.
Customize navigation menus
By default, the Shopify theme shows the Main menu (with 3 navigation links) on the header section.
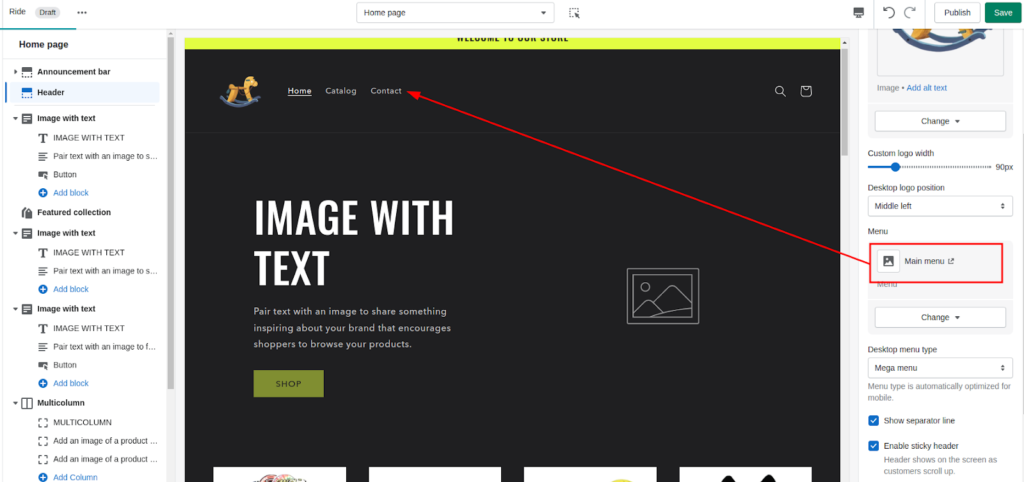
To add more links to the menu click on the Main menu and add menu items to it. You can also change the existing menu items or rearrange the sequence of the menus here.
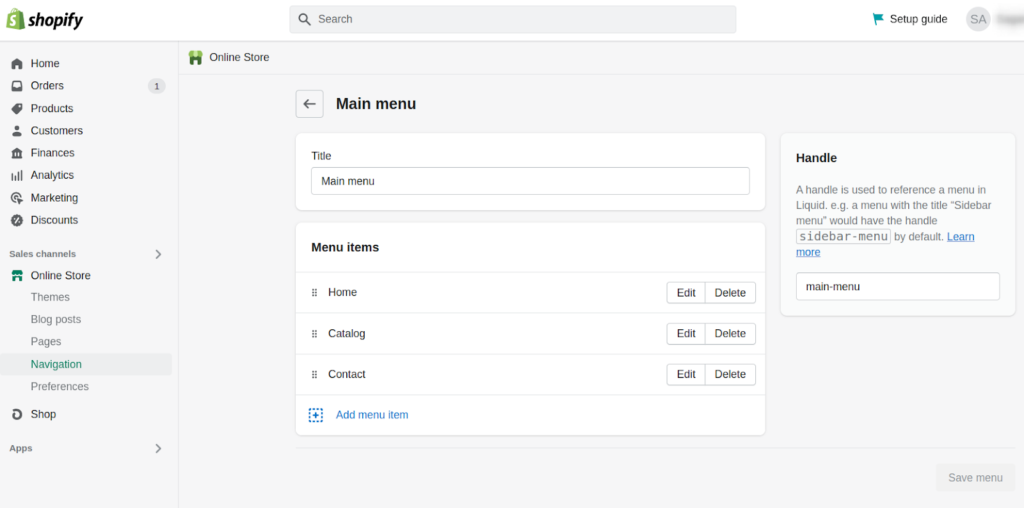
Once you made changes to the menus, don’t forget to hit the Save menu to save the changes.
Add Announcements to your store
When you’re building a new Shopify store, you may want to promote your launching event or other offers. So, you can use the announcement section to show the news, latest updates or offers to your site visitors.
Here are the steps to add the announcement:
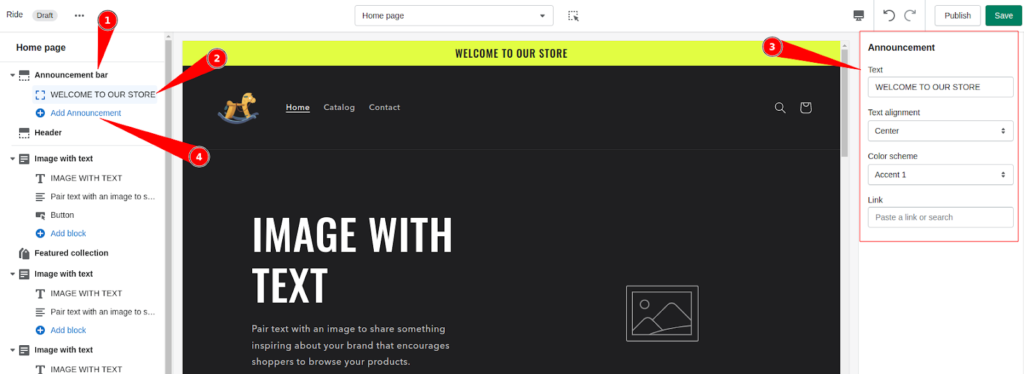
- Step 1: In the Theme editor, click on the Announcement bar section. You can see the default announcement block available in the section.
- Step 2: Click on the Announcement (block) inside the section.
- Step 3: Change the Announcement text, adjust text alignment, and color scheme, and add a link if required.
Same way, you can also add more announcement blocks in the section to highlight multiple news or offers.
After setting up the theme header, we shall move to the next important part of your theme, that is, the Homepage design.
2. Design your Homepage
When you are selling online, you cannot afford to have an e-commerce store just similar to the thousands of online stores that start and shut down in a while. For that, you need to make sure that your homepage looks professional and convincing.
The homepage is not always the first page to welcome your shoppers but they can eventually go through it. Therefore, you should make a homepage that portrays your brand in a better way.
Before you start customizing the homepage template, be handy with the necessary things such as:
- A rough layout design for your homepage
- Story behind your brand
- Value proposition of your business
- List of trending products
- Product categories that you want to feature
- Attracting offers
- High-quality images
- FAQs
- Contact details
- Testimonials
- Blogs section (optional)
Once you have everything that is required for designing an exceptional homepage, you can start editing the homepage template in your Shopify theme. Using Shopify sections and blocks, you can craft a homepage that takes your store to the next level.
Let’s explore some examples of the best Homepages for your inspiration.
Best eCommerce Homepage Examples
Before you start designing your Homepage, let’s see how professional homepages look. Here are some of the best Shopify Homepage examples:
1. Charles Simon – Luxury luggage, travel, and watch accessories

2. Goodnight Macaroon: US Leading Women’s Boutique Online Clothing

3. Tule Fog Candles

4. Fuzz Coffee Roasters

5. Aire — Premium CBD Oils

6. KEEP YA HANDS CLEAN

7. Vibes Only

8. Openface Acne body wash

9. One Love Organic

10. MyBullyLove

So here were the homepages that speak to the visitors about their brands, products, and values. I hope you get enough takeaways from these Shopify store examples for your upcoming homepage design.
After you are done customizing your Homepage, you need to focus on the product pages.
3. Personalize the Product Page
The product page is where you show off the products in your Shopify store, and where people will start looking for a product they’re interested in and initial their purchase.
Shopify themes offer a standard layout for product pages. It’s common for all product categories. Therefore, you need to create product pages as per your product types.
For example, if you are using Dawn them for your fashion store, you will get a common product page for all your product categories like clothing, handbags, and sunglasses. For clothing, you may add a size chart on the product page but it’s not required for handbags and sunglasses.
Thus, you should have a dedicated product template for clothing, handbags, and sunglasses to represent each product more precisely.
For that, you need to create custom product templates for different types of products. Let’s learn how to do that!
How to Create Custom Product Templates in Shopify
Here are the steps to create a new product page template in your Shopify theme:
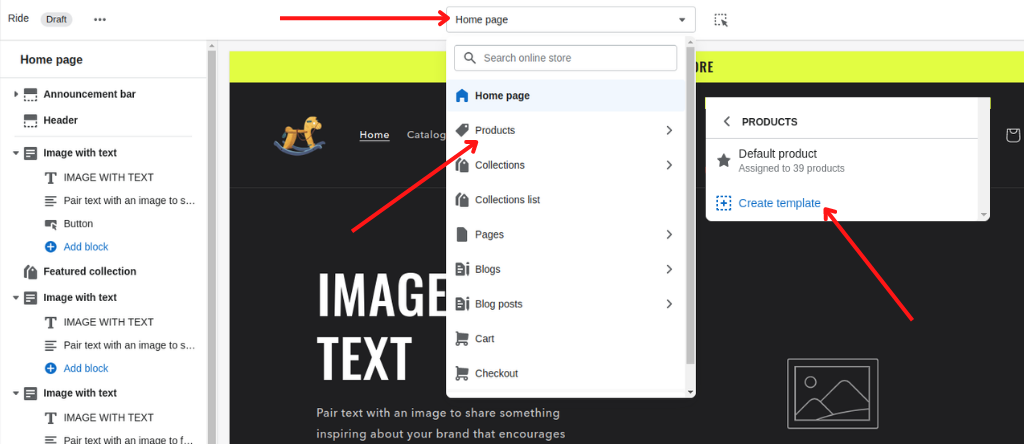
- Step 1: In the theme editor, click on the templates drop-down menu.
- Step 2: Select Products and click on Create template.
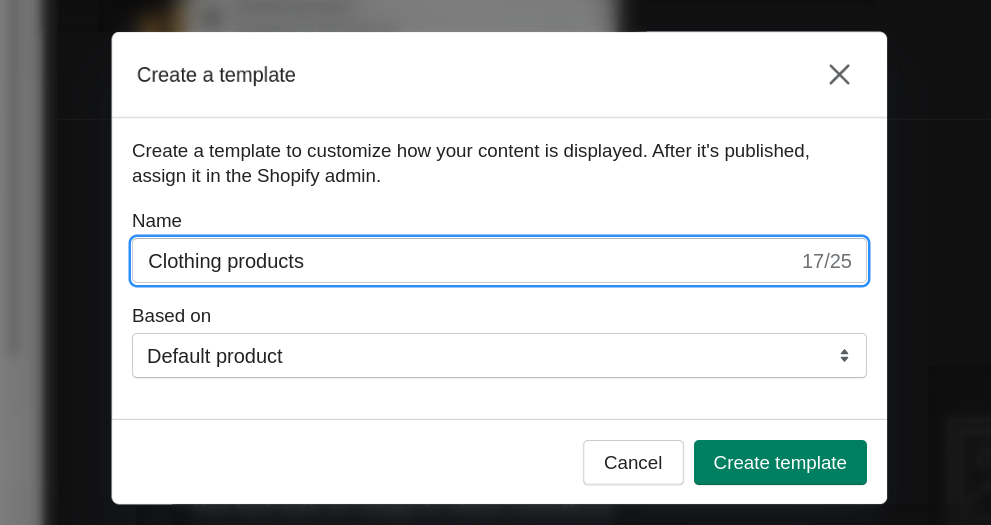
- Step 3: Now, enter a name for your new product template.
- Step 4: Click on Create template button.
This will create a new copy of the default product template. Now you can add or remove sections and blocks for a custom page layout.
Personalized product pages improve user experience and help you attract more buyers than normal product pages. They’re also a great way to create an impression that you’re more than just a seller of products.
So, if you want to make a good first impression on your customers, you need to make sure that you are using the best practices to personalize every aspect of it. And you can refer to this Shopify product page customization guide to create high-converting product pages for your store.
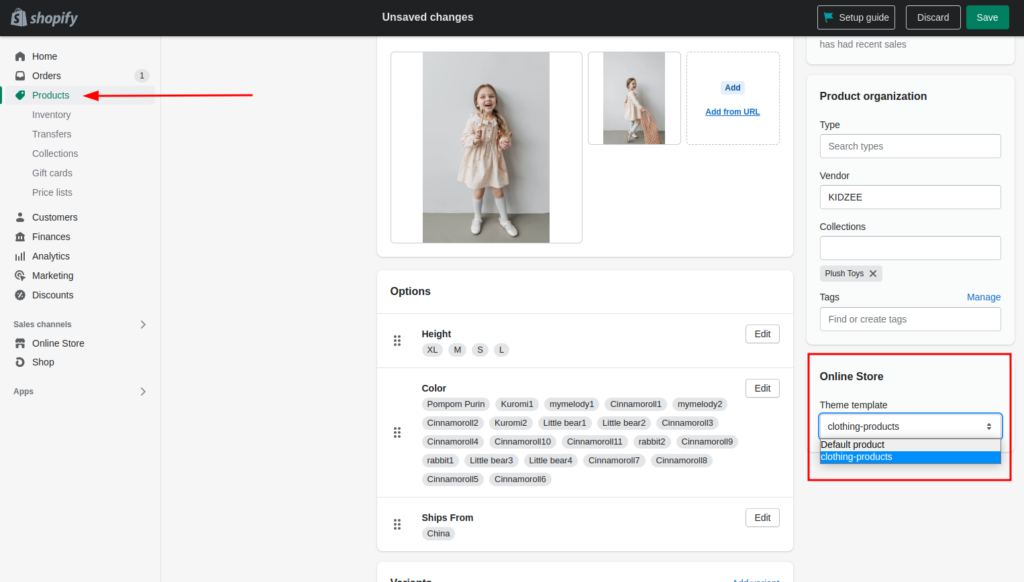
Once your product template is ready, don’t forget to update the theme template to use in your products.
4. Customize all the necessary pages
No doubt, the homepage, and product pages are the backbone of an eCommerce site. But, you cannot build a trustful online store without other pages such as:
- About Us,
- Contact Us,
- Blogs,
- Terms & Conditions,
- Shipping & Return policy, and so on.
Therefore, the next phase in Shopify theme customization is preparing other necessary pages for your Shopify store. You can find templates for some pages in the Shopify theme that you can directly customize. Whereas, you may need to create new templates for other pages as per your needs.
Open the templates and see what changes are needed to match your site requirements. Customize the theme templates one by one. You can also create a new template for a custom web page for your Shopify store.
If you need help with creating custom pages for your Shopify store, we are here to help you! You can connect with our Shopify experts and share your requirements today!
5. Improvise the Shopping Cart
The shopping cart is where the shoppers add products that they want to purchase. And according to successful store owners, the cart page is the best place where you can boost sales by upselling or cross-selling. Therefore, you need to optimize the cart page or cart drawer in your store right while Shopify theme customization.
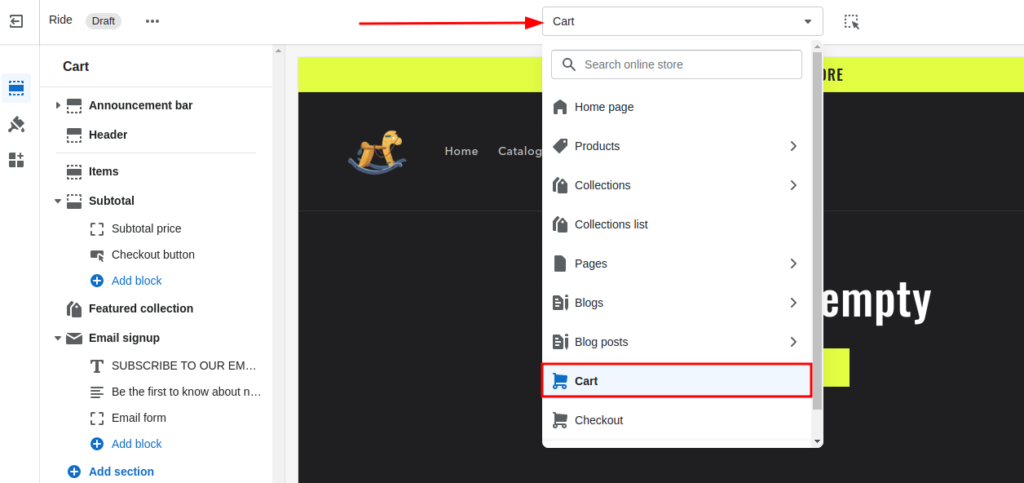
You can simply access the cart template from your theme editor and customize it to improve the shopping experience for your customers.
Just go to the Templates drop-down and select Cart to open the cart page template.
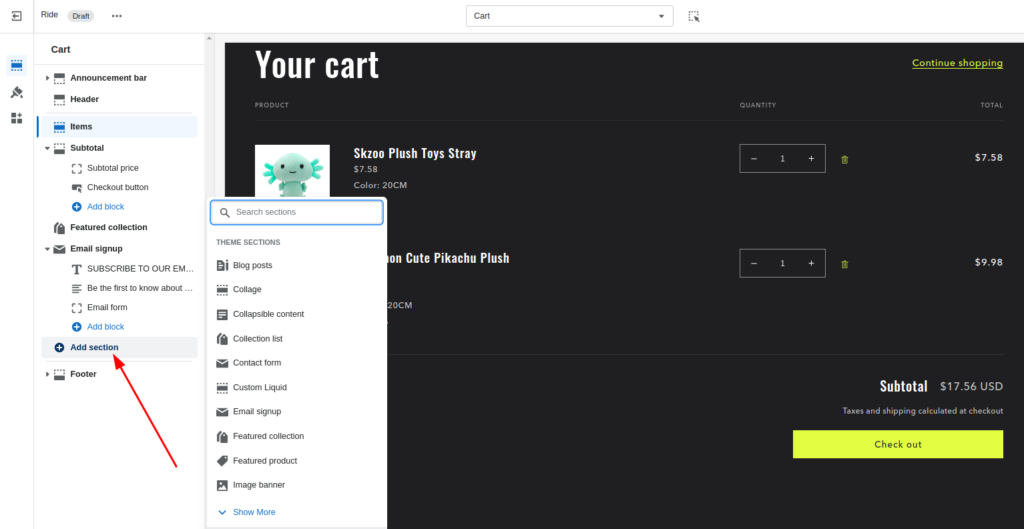
By default, it will show you an empty cart. To see the actual cart page layout, you need to add some products to your cart within your theme editor.
Now, you can add sections and blocks to your Cart template to get a customized cart page for your shoppers.
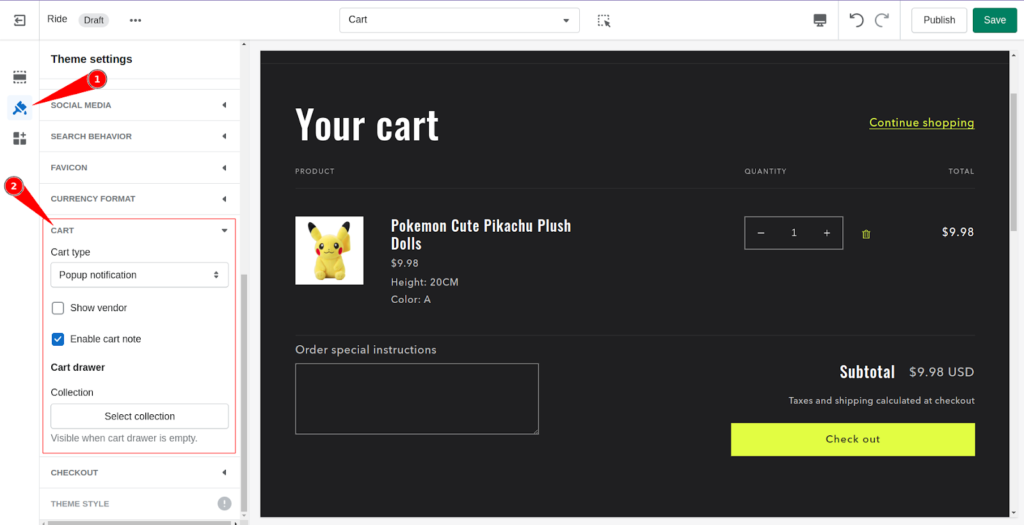
Not only this, you can explore the theme settings for more customization options as shown below:
There are many third-party apps for in-cart upsell, rewards, announcements, coupons, and more that you can use to optimize your cart page and reduce cart abandonment. But, be careful while using these apps, as the bad scripted apps can slow down your site.
If you’re not sure which apps you should add to your store that don’t affect your online store, you can opt for our Shopify Integration Services.
6. Customize the Checkout page
Now, it’s time for customizing the Shopify one-page checkout! Whether you have an online grocery store or clothing store, Shopify offers a common checkout page for all types of eCommerce stores.
Yes, you can customize the checkout page to add your brand identity and maximize the personal user experience. Here’s see how to customize the checkout page in Shopify.
Steps to customize the checkout page in Shopify
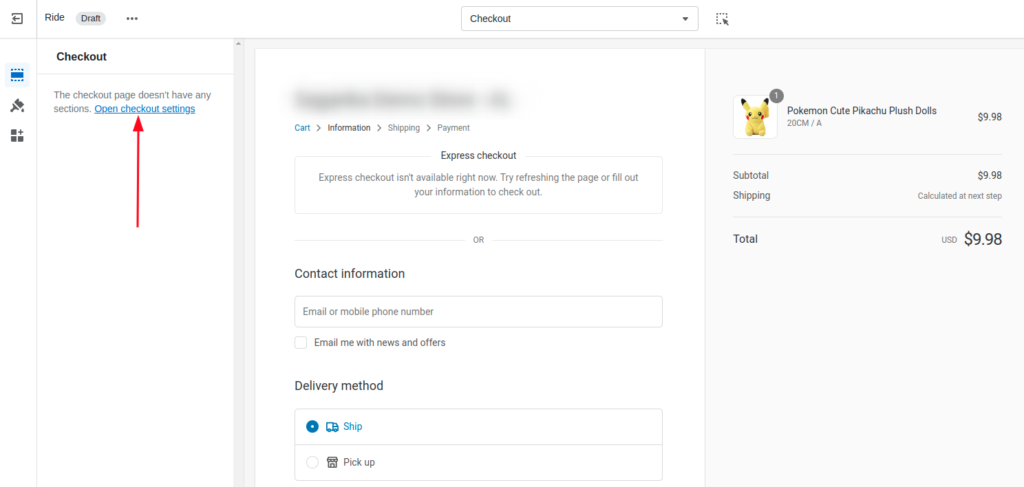
- Step 1: From the Theme editor, open the Checkout page template.
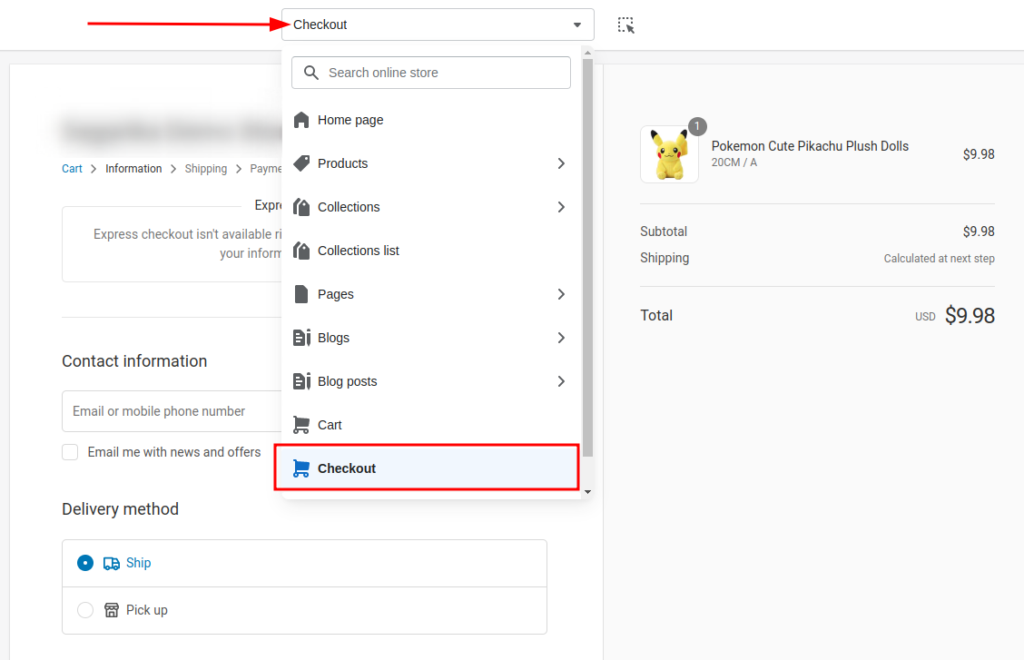
- Step 2: Click on Open Checkout settings.
- Step 3: Scroll down and open the Checkout section in the theme settings.
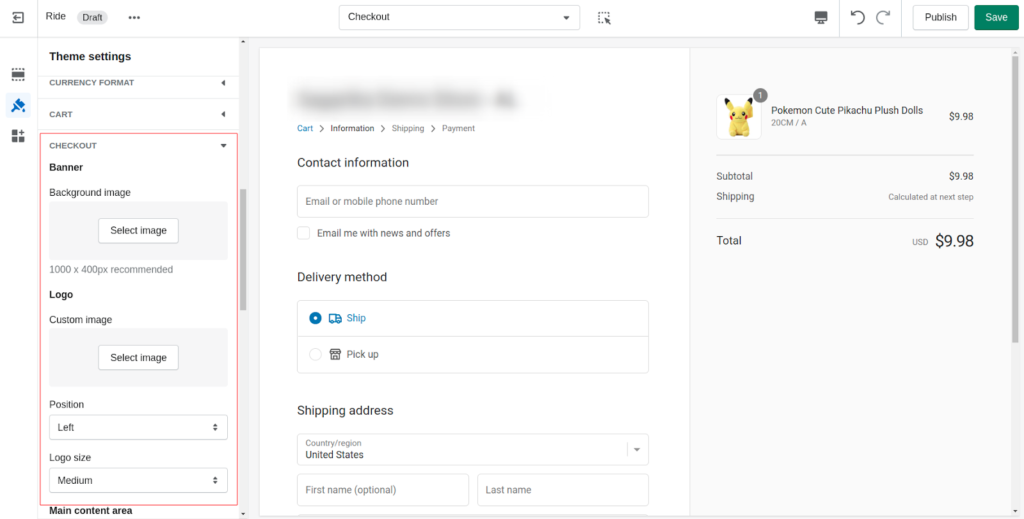
Now, you can customize the appearance of the default Shopify checkout page as per your needs using the options.
- Step 4: Save the changes!
That’s it!! This is how you can make changes to your checkout page.
Are you looking for advanced checkout customization?? You can take the help of Shopify experts to transform your checkout page for a better shopping experience.
7. Set up the Footer Section
Similar to the Announcement bar and header, the footer is the static section in Shopify themes. Therefore, you cannot move them within the templates. But you can customize the footer of your online store using various section blocks as shown below:

If required, you can add more blocks by clicking Add block. The theme will automatically align the blocks within the footer section.
While customizing the footer, you may have noticed “Powered by Shopify” at the bottom of the section. Well, the good news is, you can remove it if you don’t wish to show it on your site.
How to remove Powered by Shopify?
Follow the steps below to remove “Powered by Shopify” in a few minutes:
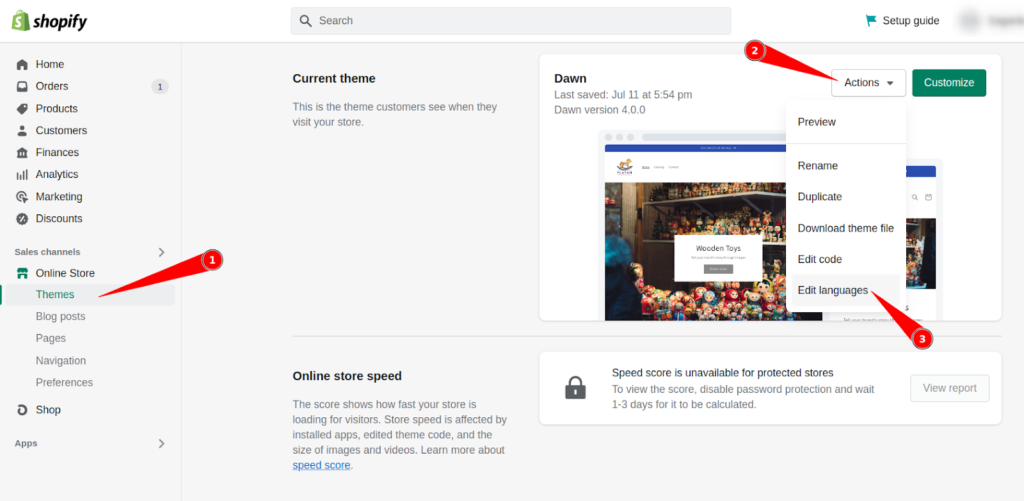
- Step 1: From your Shopify Admin, go to Online store > Themes.
- Step 2: In your current theme, click on Actions > Edit language.
- Step 3: Use the Search box to find the “Powered by Shopify” text fields.
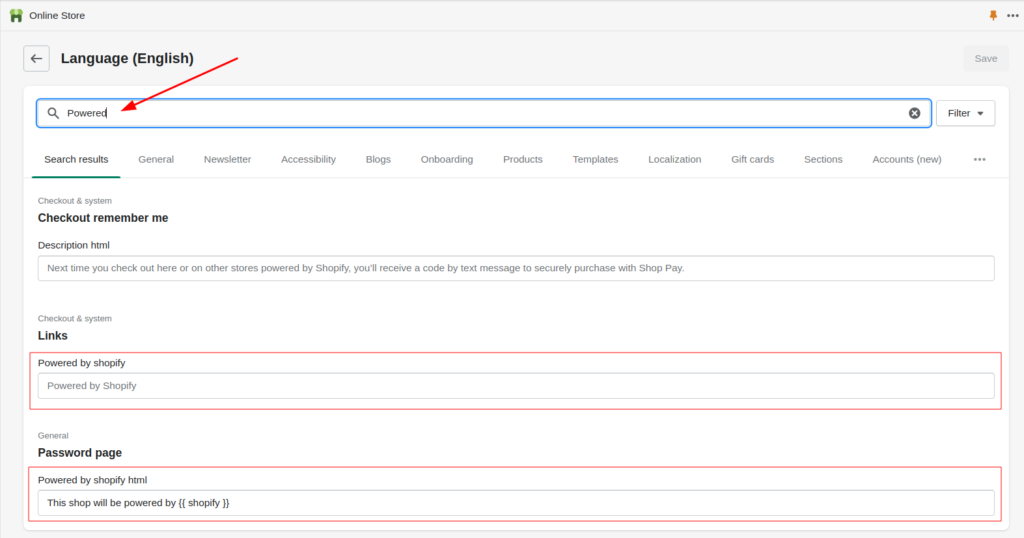
- Step 4: The Powered by Shopify text fields are already filled with default text. Just add blank space to both text fields as shown below:
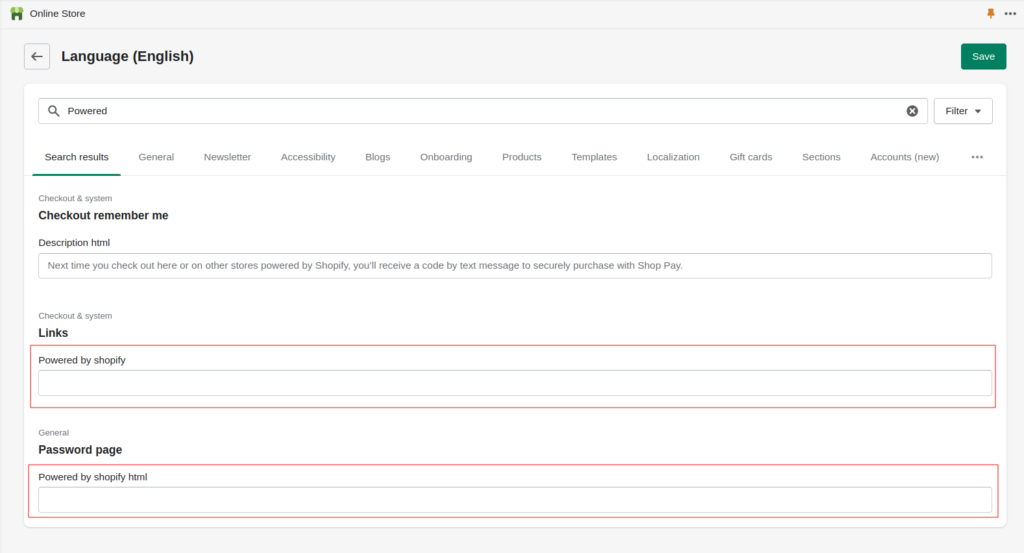
- Step 5: Hit the Save button.
This is how you can customize your footer section for your Shopify stores.
Next, we’ll see what else you can do to customize your Shopify theme using Theme settings.
8. Customize Shopify Theme Settings
In every Shopify theme, you get Theme settings, where you can find a bundle of options to add more customization to your theme. All these options or settings are categorized; some of them by the templates and others are by the types of customization.
To access the theme settings in the theme editor, click on the second icon beside the template options.
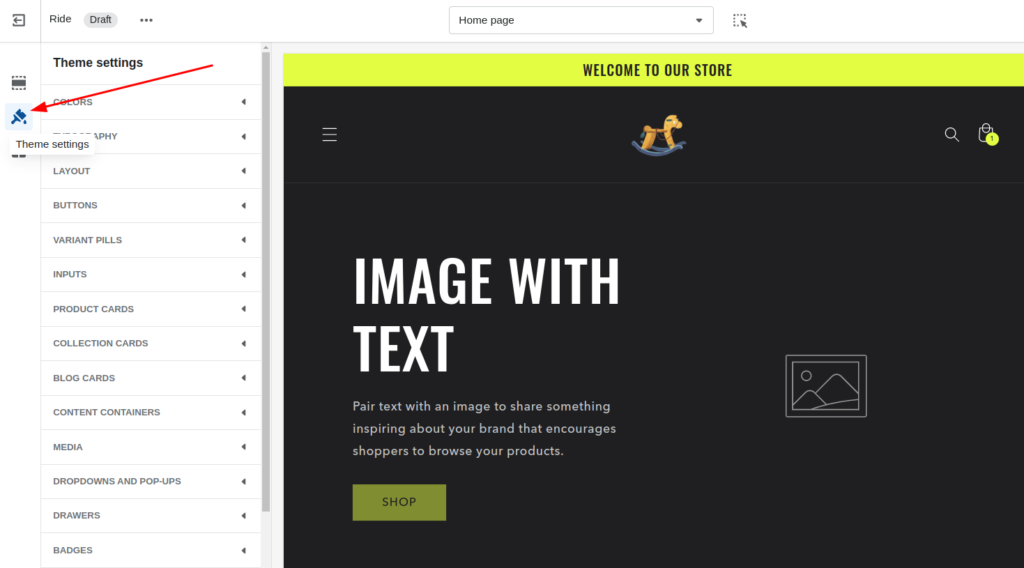
Now, let’s see all the components on the theme settings one by one!
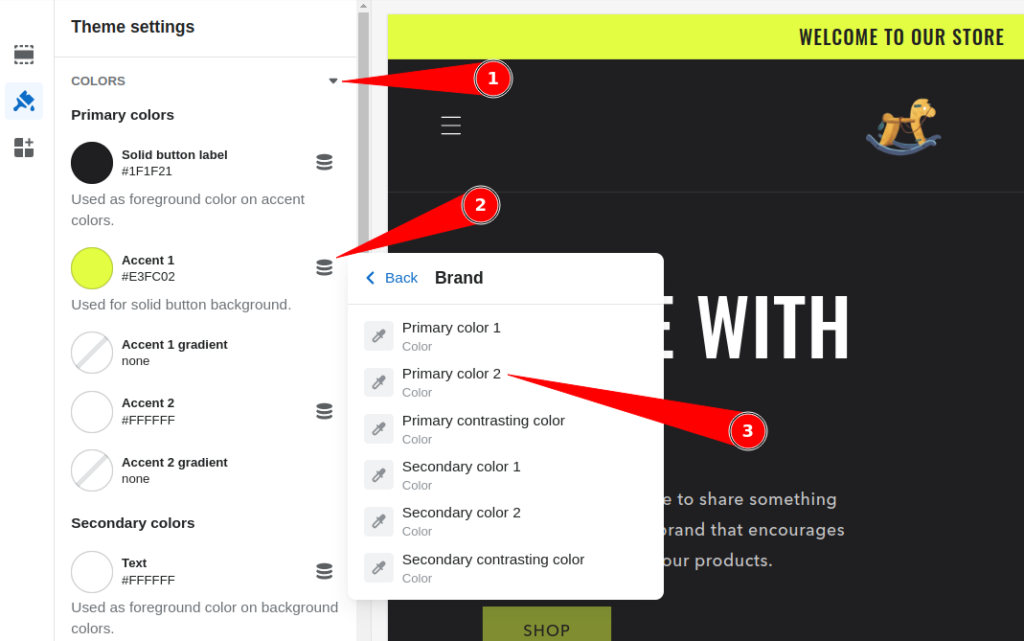
Colors
The color container offers the primary and secondary color settings for your text, button outlines, and background of your theme. You can also apply gradient colors to your theme using this theme setting.
Just pick the colors and experiment new look.
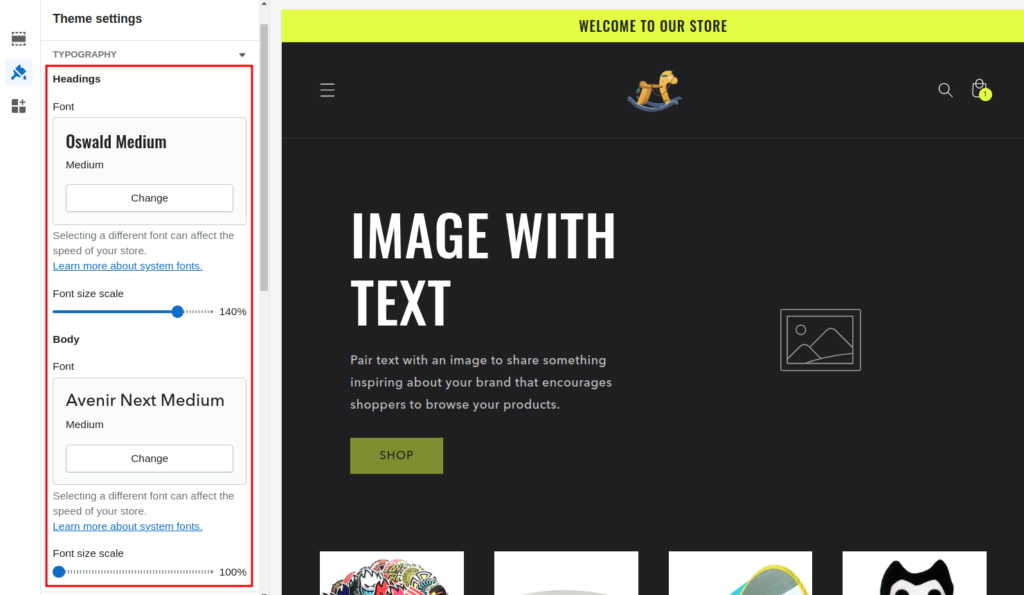
Typography
The Typography gives you access to the font settings for your theme. You can use these options to customize the headings and body font style as well as size on your site.
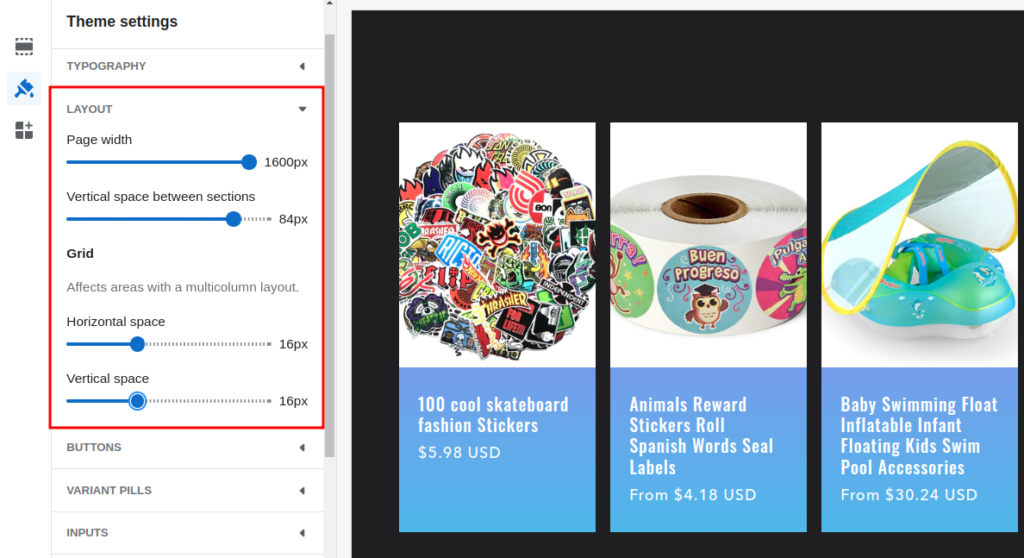
Layout
The Layout options give you control over the theme layout. You can adjust the page width as well as spacing between sections and grids using the Layout settings.
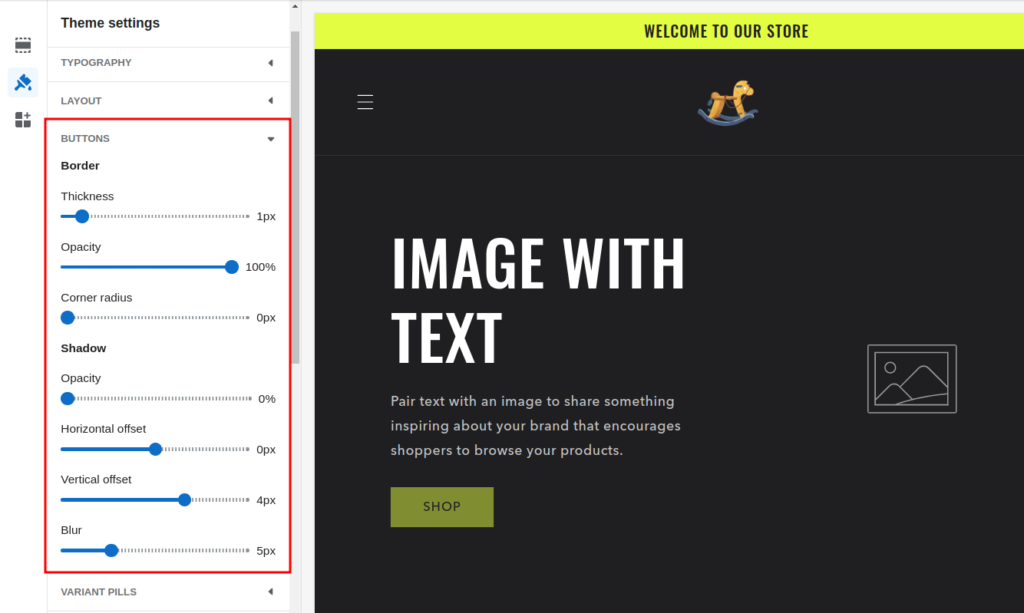
Buttons
CTA plays a vital role in the shopping journey of your customers. And now you can make your website CTAs more attractive using the Button settings.
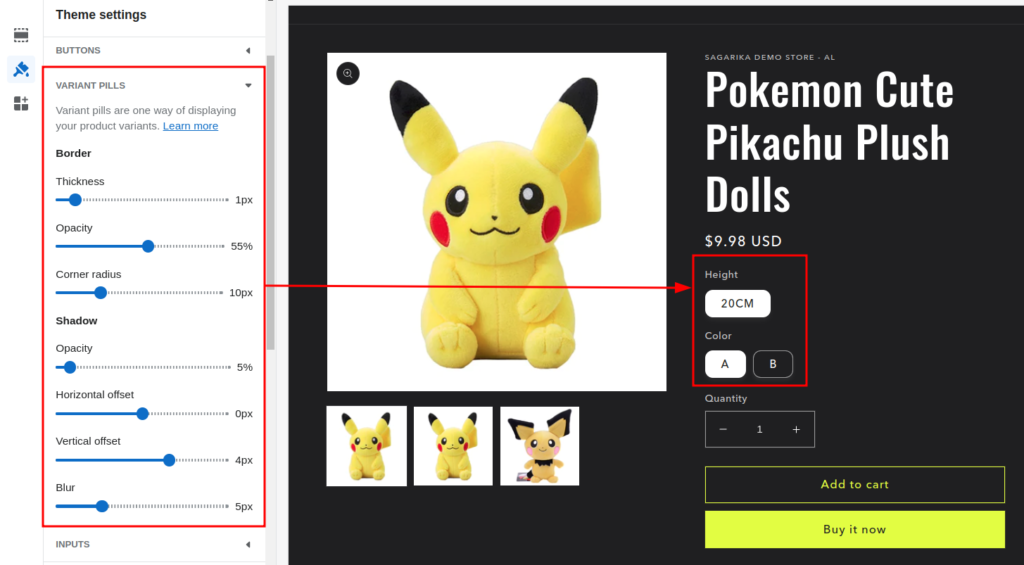
Variant Pills
There are 2 ways you can display the product variants on the product page: (1) drop-down and (2) variant pills. So, Variant Pills are the clickable buttons for each variant. And these settings will let you customize the shape and style of your variant pills on the product page.
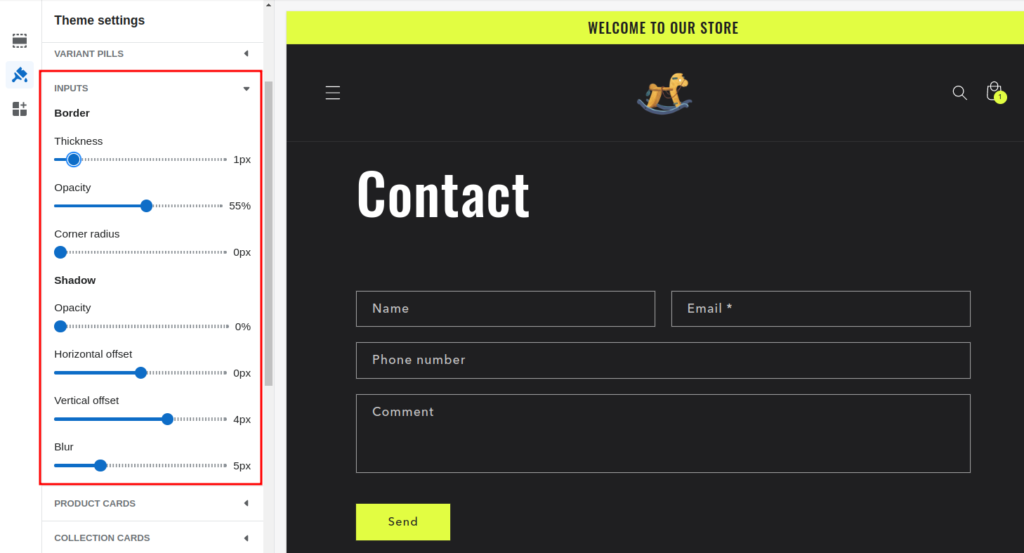
Inputs
The Inputs options let you customize the border and shadow effects of the input fields in your site.
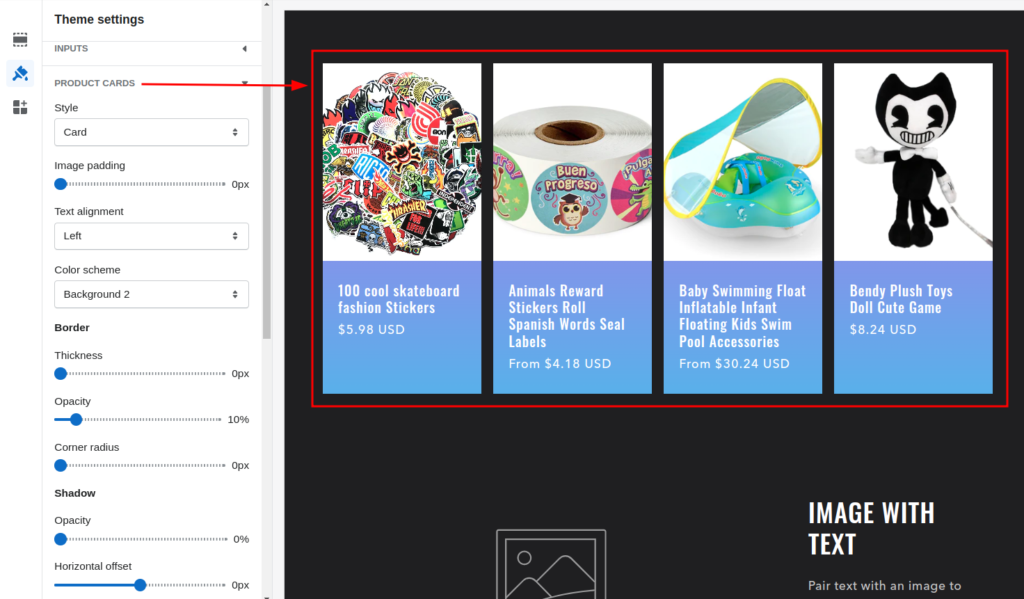
Product Cards
The product cards let you customize how you want to display the product cards in your online store.
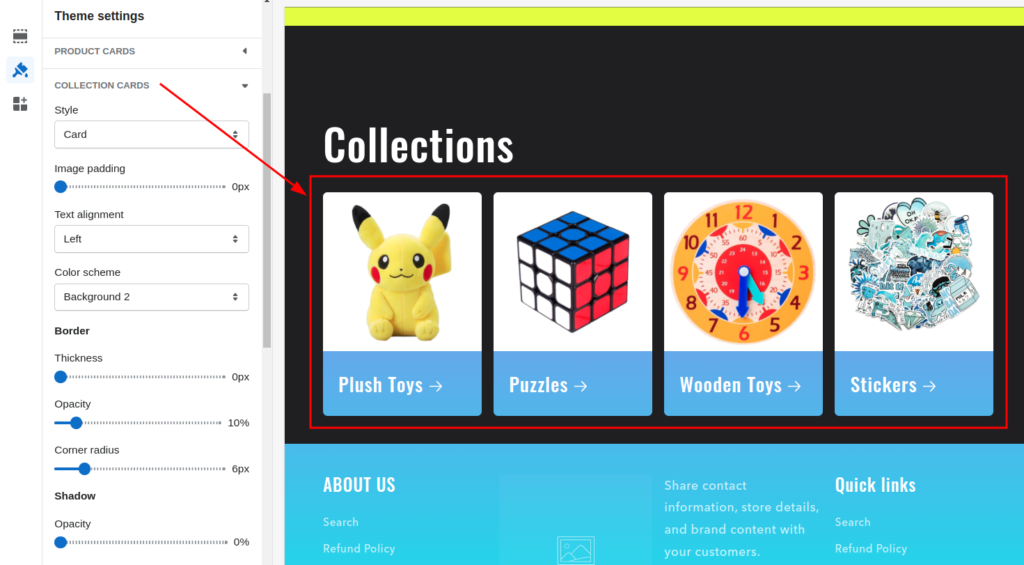
Collection Cards
These options let you change the way you want to show the collection cards in your store.
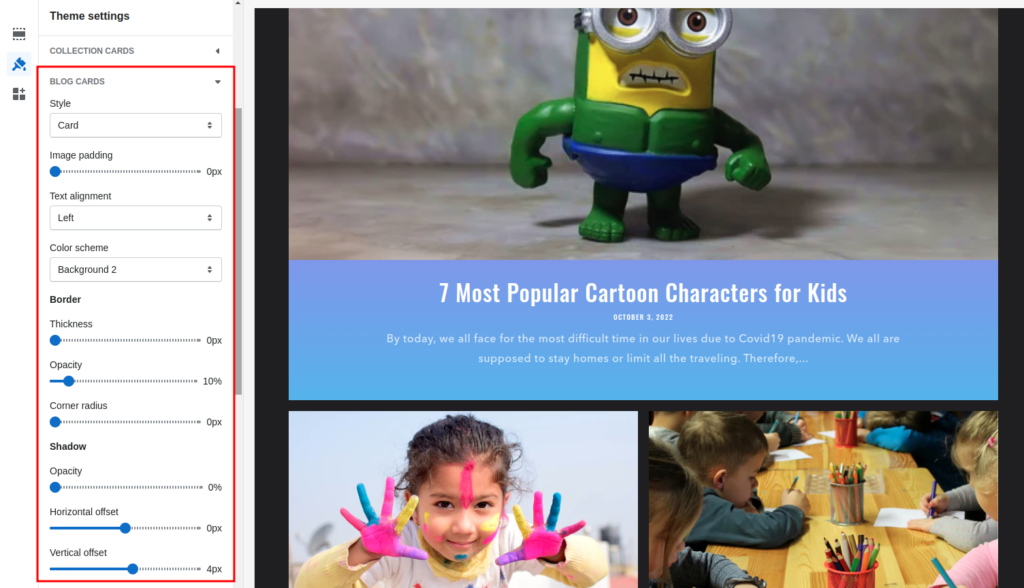
Blog Cards
Similar to the product cards and Collection cards, the blog cards will let you to customize the blog cards in your Shopify store.
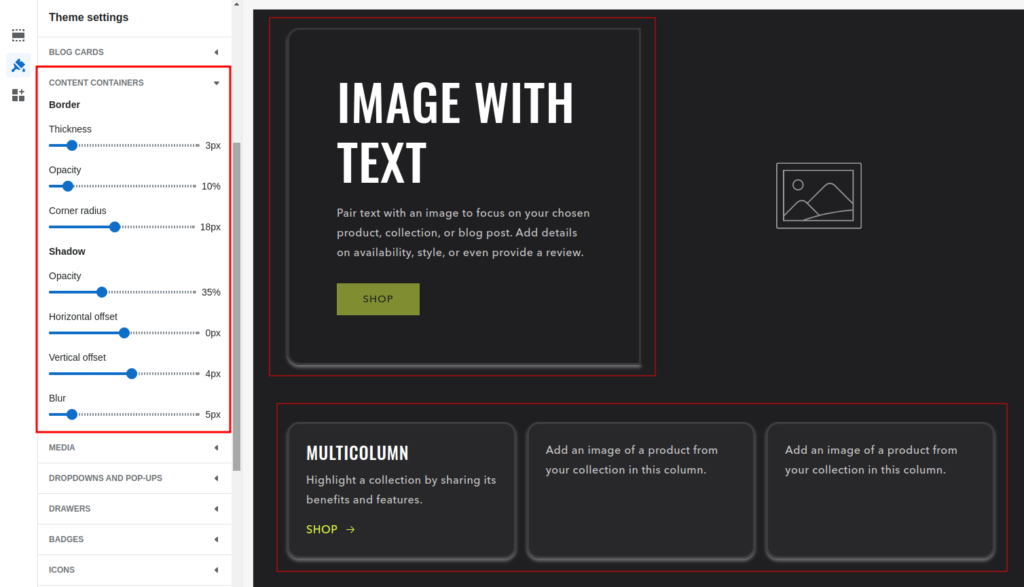
Content Containers
Content containers are the place where you add text (content) using Shopify theme sections or blocks. These settings give you control to change the appearance of the content containers.
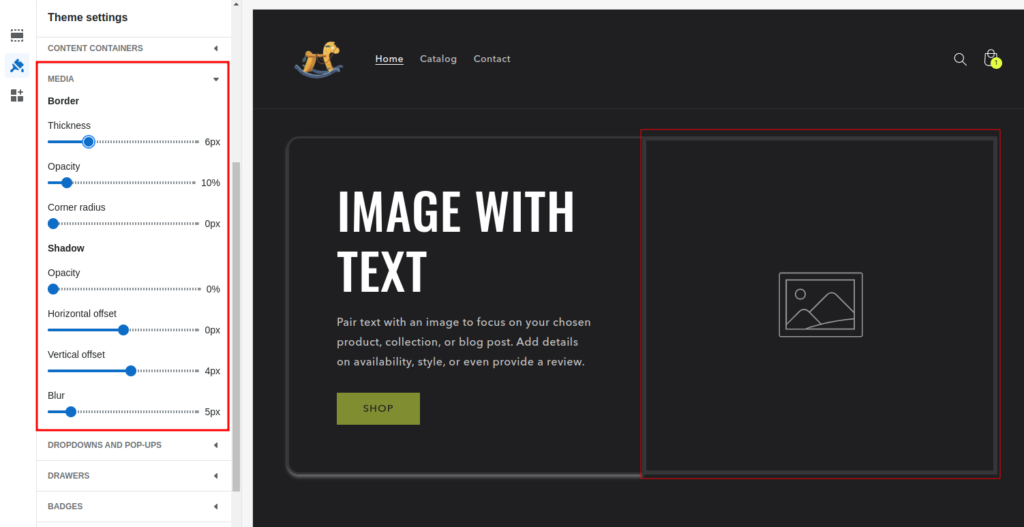
Media
Same as the content containers, with the Media settings, you can customize the appearance of the media placeholders, i.e. images or videos.
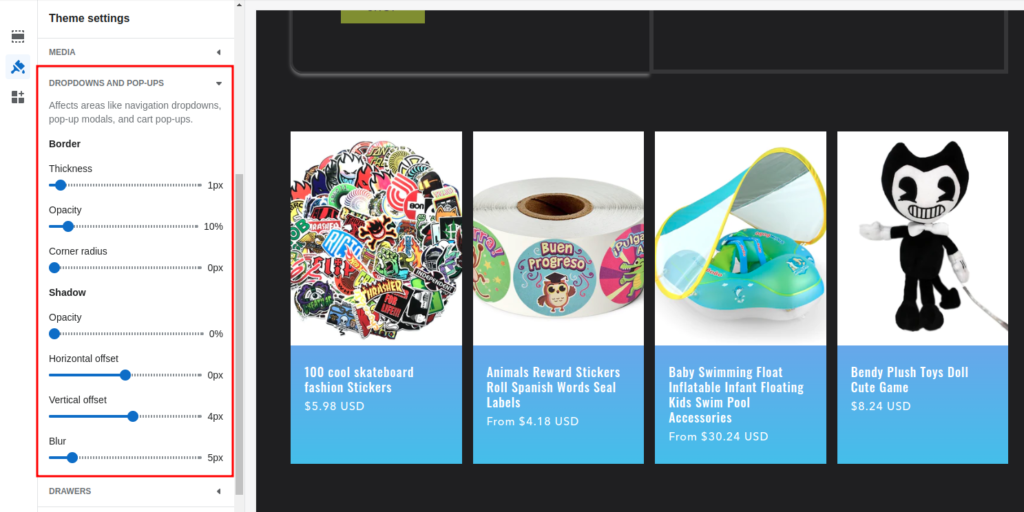
Dropdowns And Pop-ups
If you are using dropdowns and pop-ups in your online stores like navigation dropdowns, and cart pop-ups, these options will help you customize them.
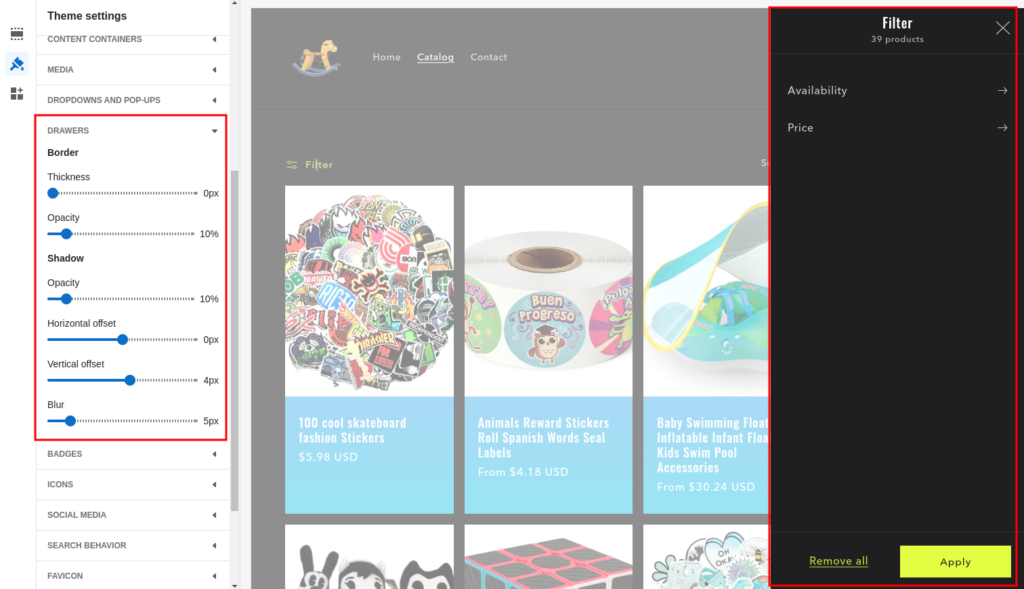
Drawers
You can customize the appearance of the cart drawer or filter drawers in your store using the Drawers settings.
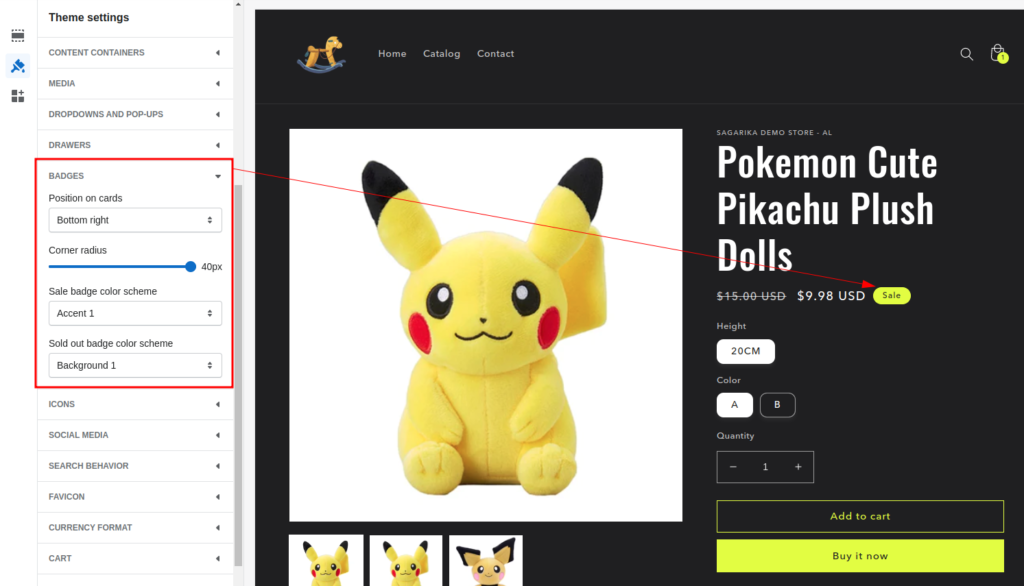
Badges
You may find badges on your product when you add different selling and cost prices for that product. These options will allow you to customize the badges in your store.
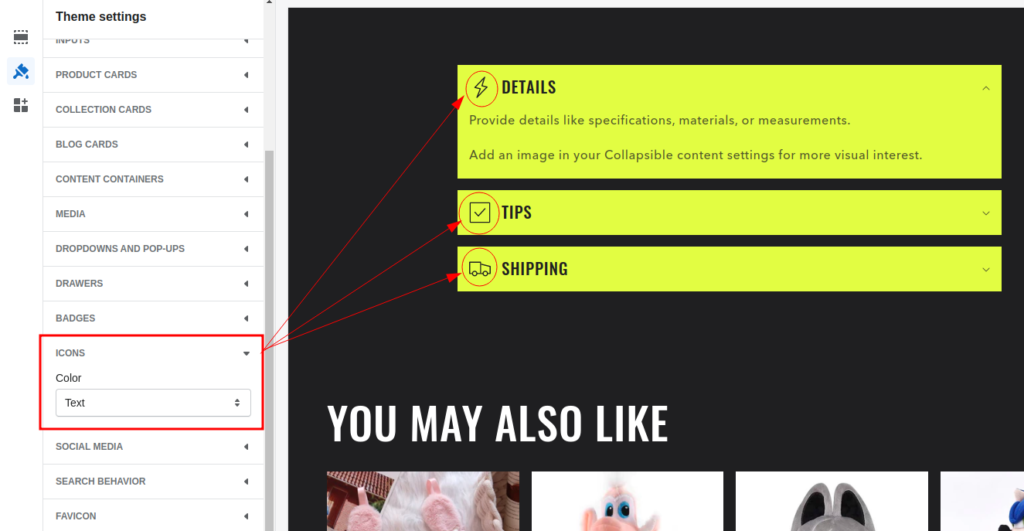
Icons
This allows you to change the color of all the icons in your Shopify theme.
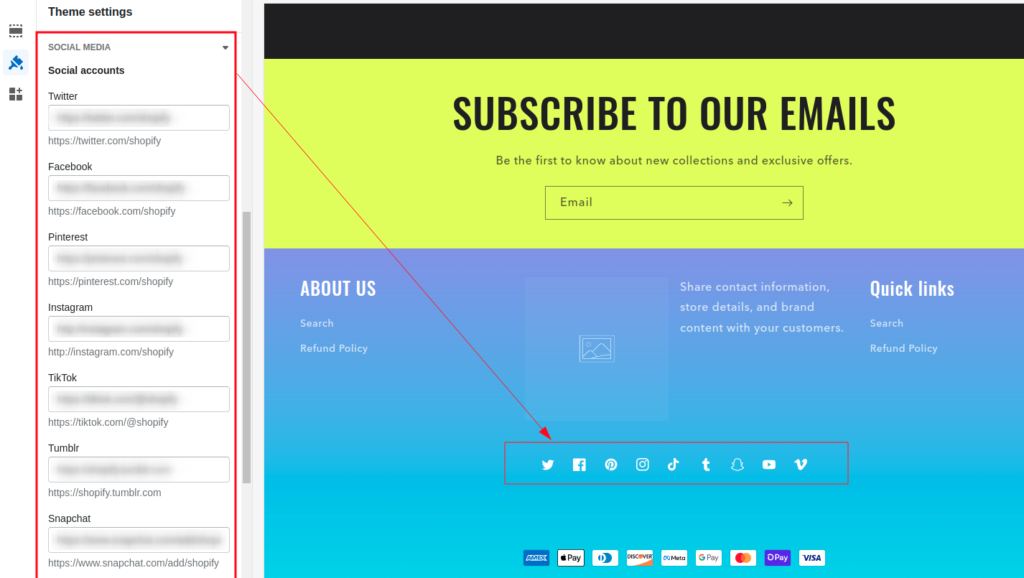
Social Media
Here you can add the social media profile links of your brand so that your store visitors can check out your brand on different platforms.
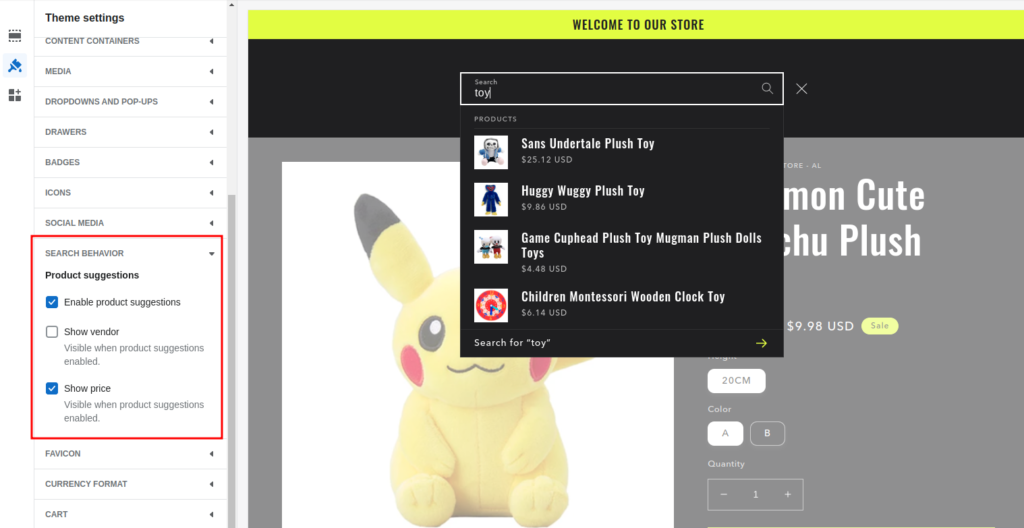
Search Behavior
These options allow you to choose whether you want to show product suggestions when shoppers search any term. You can also show vendors as well as prices along with the products.
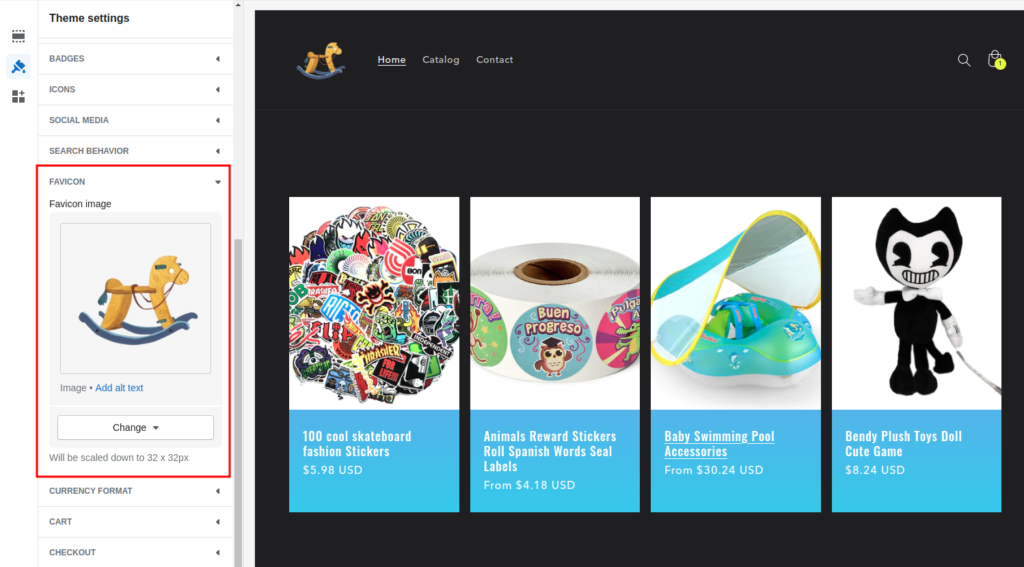
Favicon
Here you can add a favicon image for your Shopify website.
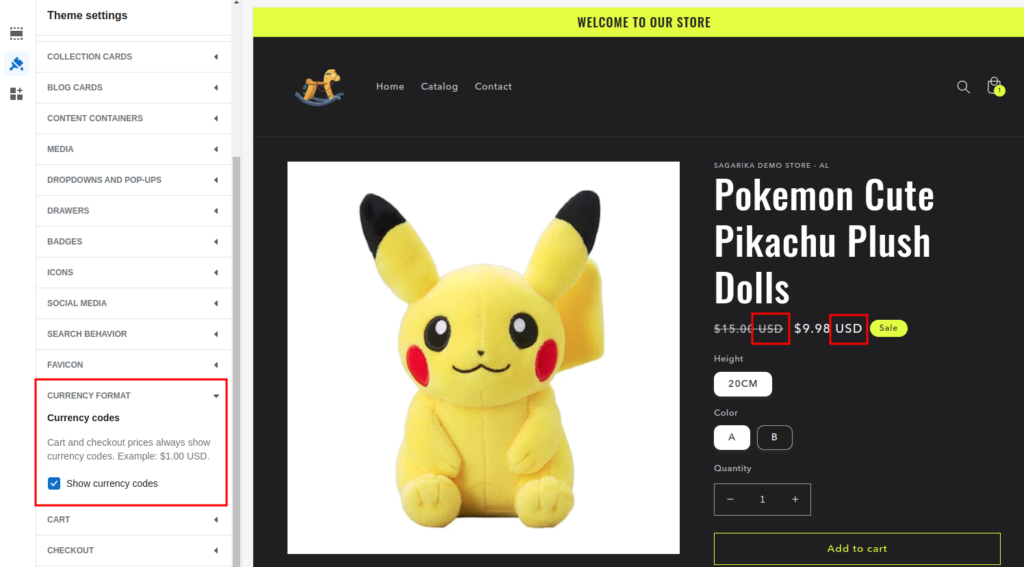
Currency Format
Using the currency format option you can enable or disable showing the currency codes beside the amount.
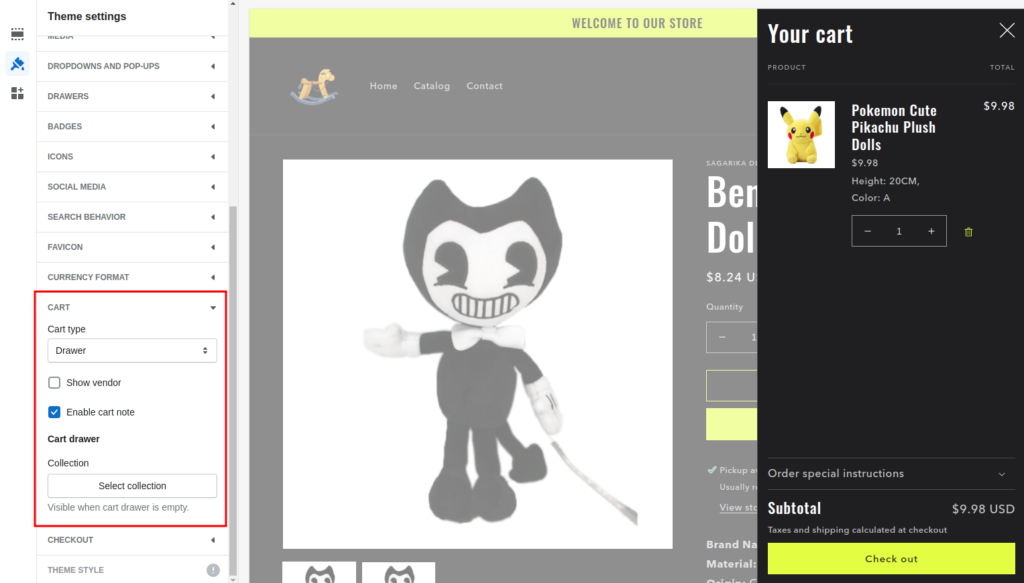
Cart
You can find the cart template in your Shopify theme to customize your store’s shopping cart. However, you get additional customization options in the theme settings. Here, you can select the type of cart you want to show to your shoppers, and other options like showing cart note, vendor or collection.
Checkout
Unlike other pages in the Shopify theme, the Checkout page does not come with a template where you can customize the checkout page. You get some customization options in the theme settings to personalize your checkout page (step-by-step instructions are available above in the “Customize the Checkout page” section).
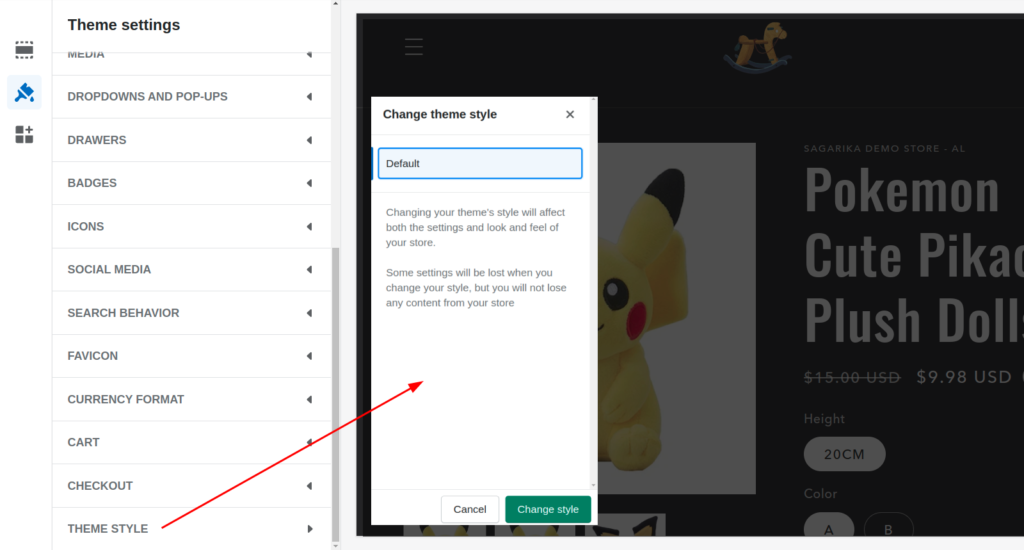
Theme Style
When you make changes in your theme settings you can lose the default settings. Therefore, Shopify gives you an option to restore your default theme style.
So, here the Shopify theme settings end. If you are using Shopify themes, the customization options you get with the theme are enough to amaze you. But if you need some unique needs in your mind then we can help you with Shopify custom theme development for your online store!
Hope this guide helped you with the information you were seeking. Let us know if you have any points we missed.