
If you are a Shopify merchant or developer, then you know all about the power of metafields. The Shopify metafields allow you to add custom fields to any page or object in your store. Shopify 2.0 Metafields are both powerful and flexible; they can be used to display anything from additional product details on a product page to extra information about a customer on an order page.
But what if there was an easier way to create and manage metafields? Shopify Online store 2.0 offers the new metafields that helps you to add dynamic content to your store in a more efficient way. In this article, we’ll explore why they’re so much better than their predecessors. Also, you will learn how to display Shopify metafields on your online store.
Shopify 2.0 Metafields
Before we start with Shopify 2.0 metafields, let’s understand what are metafields? Metafields are extra data fields that complement core Shopify data. They can be used for all kinds of information, including product reviews, team members, or even custom information about your customers.
Shopify 2.0 metafields are the new and improved way to add custom fields to your store. They’re more flexible and powerful than the old Shopify metafields and are a great tool for advanced users.
Shopify 2.0 Metafields offer a lot of additional features that are not available in the old Metafields.
Benefits of Shopify 2.0 Metafields over Old Metafields
- The new metafields are easy to use. You can easily create metafields based on the type of metafield and add them to the theme editor to display in your store. You don’t need to edit the code files to use them.
- The second benefit is the ability to set granular permissions on each metafield. You can now select whether you want to show your metafields to the storefront or just want to create them for internal use.
- The next benefit is the ability to target your metafields using liquid code. This feature is extremely powerful, and you can show your metafield content only when certain conditions are fulfilled. For example, if a product price is below $100, you can show a “Free Shipping” badge on top of the product images.
- Shopify 2.0 Metafields are free to use. With new metafields, you don’t need to spend extra on third-party apps to add custom data to your store.
If you have upgraded your Shopify store to online store 2.0 then you can take advantage of all the great features of Shopify 2.0 metafields.
Now let’s explore the different types of Shopify 2.0 metafields you can add to your online store.
Shopify Metafield Types
Shopify offers 8 types of metafields based on the different areas of your online store such as,
- Products
- Variants
- Orders
- Customers
- Collections
- Pages
- Blogs
- Blog Posts
1. Product Metafields
Shopify product metafields can help you keep track of any additional information about a product. Let’s say you are selling shoes and want to add the color of shoelaces as an important attribute during your product search.
This is where Shopify metafields come in handy. You can simply create a metafield and map it with the attribute name ‘Shoe Lace Color’ on your products. When users search for products with specific attributes, they will be able to narrow down their searches according to the shoelace color.
2. Variant Metafields
With Shopify variant metafields, you can also create metafields at the variant level. This is useful when you have different variants in a product that need unique information such as a size guide or specific delivery information.
3. Collection Metafields
Shopify collection metafields can be used to add more information about a particular collection or make changes to the appearance of the collection page on your store. For example, you can add custom tags via collection metafields if you want them to appear on your collection page.
4. Customer Metafields
You may wish to add extra custom fields for customers when they sign up for your store. Shopify Customer metafields can help you with that. You can use this to store data like customers’ favorite colors or the last time they’ve logged into your store.
You can also use these fields to store referral codes and other links that customers will share with their friends in order to get discounts on products they purchase.
5. Order Metafields
Shopify Order Metafields lets you store order-related data on your store. If you’re selling physical goods, you might want to add the weight of products so you know how much shipping to charge. This can also be used if you’re storing extra information about orders that don’t fit into other Shopify fields, such as special delivery instructions from customers.
6. Page Metafields
Shopify Page Metafields are helpful when you need to add custom data for each page in your Shopify store. Suppose you are using the same landing page template for all your landing pages, but want to show different discount offers for different pages. In such cases, you can take the benefits of using Page metafields.
7. Blog Metafields
Shopify Blogs Metafield works in a similar way to regular Shopify metafields, but it has a different purpose. Blog Metafields lets you store information related to the blog categories. You can find this metafield in Online Store > Blog Posts > Manage blogs.
8. Blog Post Metafields
Shopify Blog Post Metafields are useful when you need to add custom data to individual blog posts. Suppose you want to show a product or a list of products in between the blog post content, and every time it shows different products based on the blog post. You can achieve this using the Blog Posts metafields.
Hope this helped you understand the different types of metafields offered by the Shopify eCommerce platform. Now let’s see how easy it is to create and use metafields in your Shopify store.
How To Use Metafields In Shopify?
Adding Shopify metafields to your store is quite simple if you are using Shopify 2.0 themes. Let’s move our steps towards creating Shopify metafields.
Creating Shopify 2.0 metafields starts with defining the metafields. After that, you can add values to the metafields and connect them to your storefront to display them on your Shopify store.
Therefore, here we shall learn to add Shopify metafields in 3 parts:
- Creating Shopify metafield definition
- Adding values to Metafields
- Displaying metafields in the store
If you haven’t created a metafield in your store yet, let’s get started with creating your first Shopify 2.0 metafield.
PART 1: Creating Shopify Metafield Definition
Here are the steps of creating a metafield definition in Shopify:
Step 1: Go to Settings > Metafields, from your Shopify store admin.
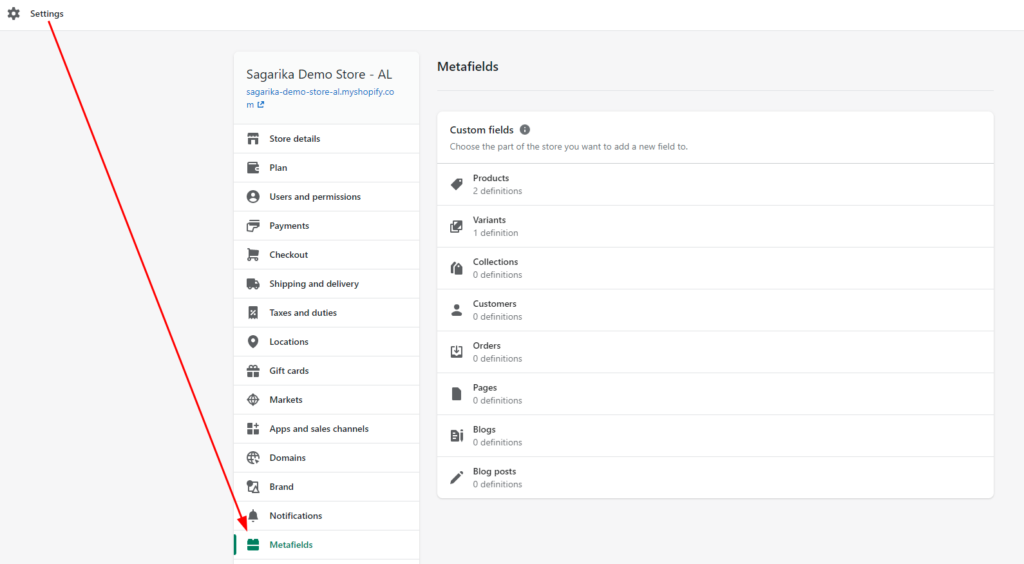
Step 2: Select any metafield type (where you want to create the new metafield) from the list. For example, Products. This will add metafields to all products.
Step 3: Click on the ‘Add definition’ button.
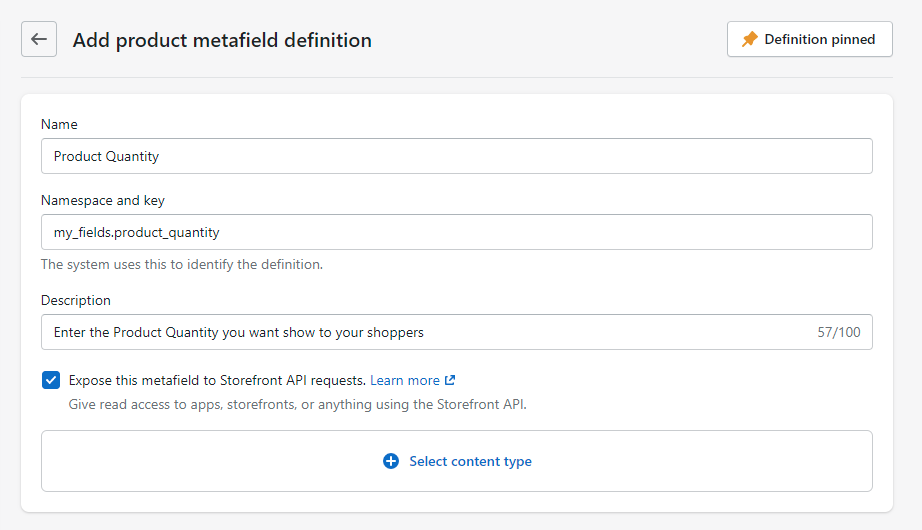
Step 4: Enter the metafield name and you can see the “Namespace and key” will update automatically. It’s good practice to put a note in the Description field so that you remember what it was added for later on.
Step 5: Tick the “Expose this metafield to Storefront API requests” option if you want to allow third-party apps and custom storefront APIs to access your metafields.
Step 6: Now select the “content type” based on the value you want to add to the metafields. You can also specify “validation rules” to the content type to ensure your metafields have accurate values.
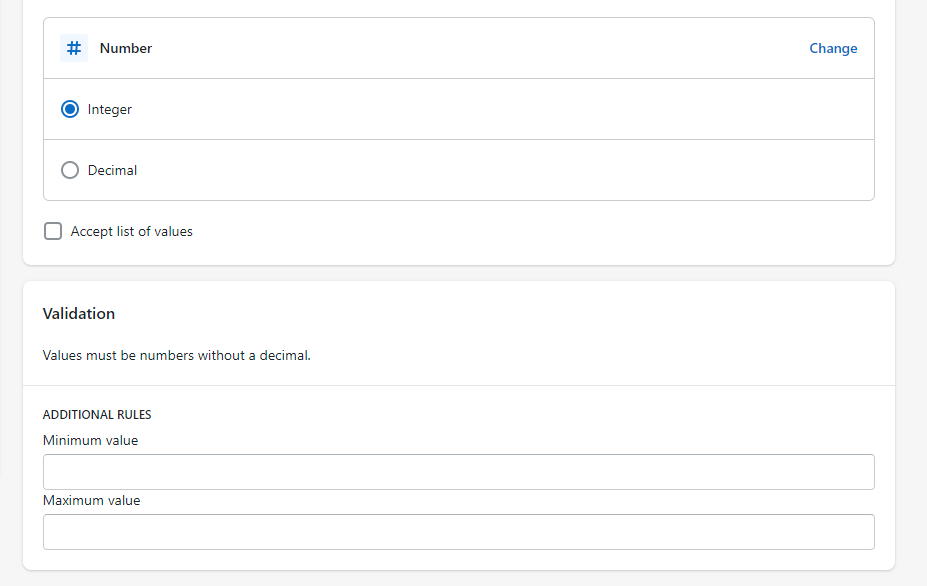
Step 7: Hit the save button.
That’s it. This way you can create a Shopify metafield in less than 2 minutes. After creating the metafield definition, you are now free to add values to the metafields and then display them in your online store.
Let’s learn how to do that.
Also Read: Shopify Product Page: 7 Best Customization Tips With Examples
PART 2: Adding Values to Shopify Metafields
Please follow the steps below to add values to your newly created Shopify metafield.
Step 1: Based on the type of metafield you created, you need to go to the appropriate place in your Shopify store admin.
For example, if you have created a collection metafield, you need to open the Collection detail page from the Shopify store admin.
As I’ve created a product metafield, I have to go to the Products detail page.

Step 2: Simply enter the value in the box beside the metafield name.
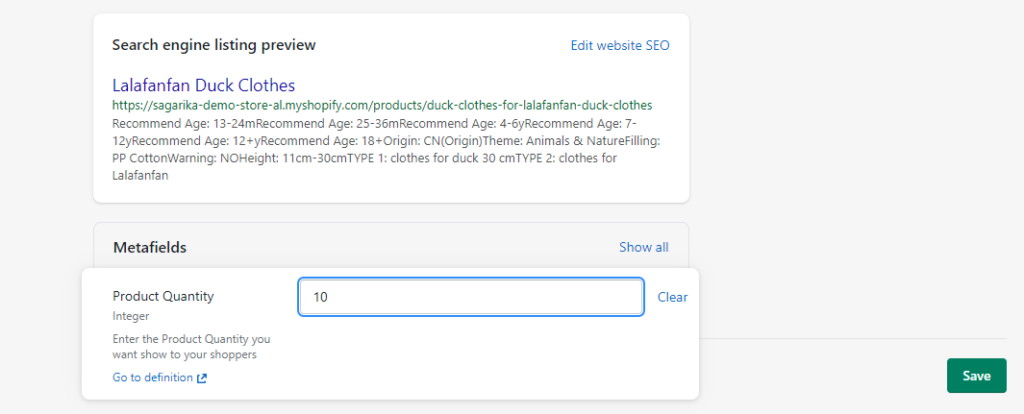
Step 3: Now save the changes.
This way you can add the metafield values for other products. Now let’s learn how to show these values on your Shopify storefront.
PART 3: Displaying Metafields on the Shopify Store
How to get metafield value in Shopify? To make the metafield values visible on the storefront, first, we need to connect the dynamic source using the Shopify section or blocks.
Here are the steps to display Shopify 2.0 Metafields on the Storefront:
Step 1: Go to your Shopify store admin and open the theme editor.
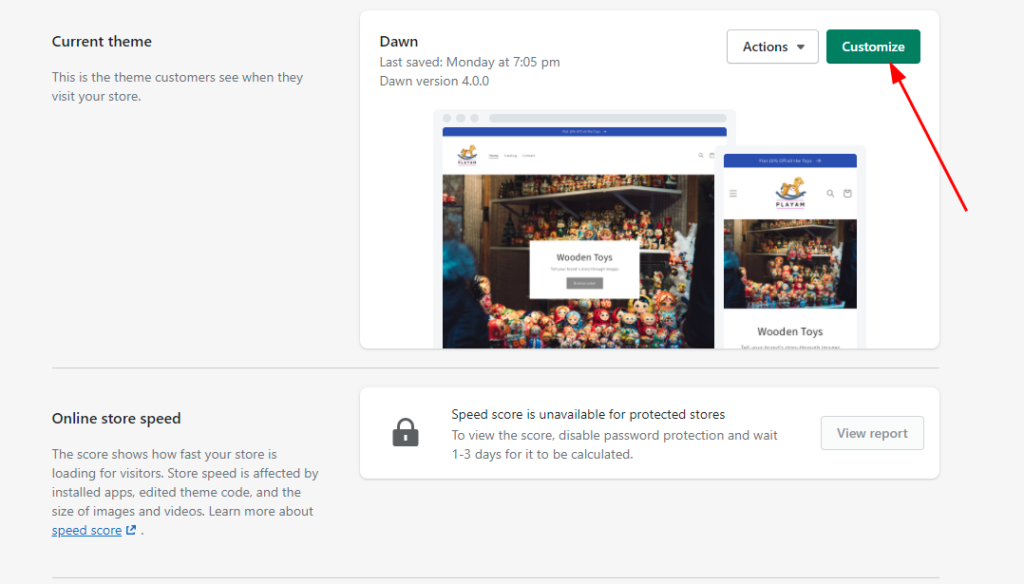
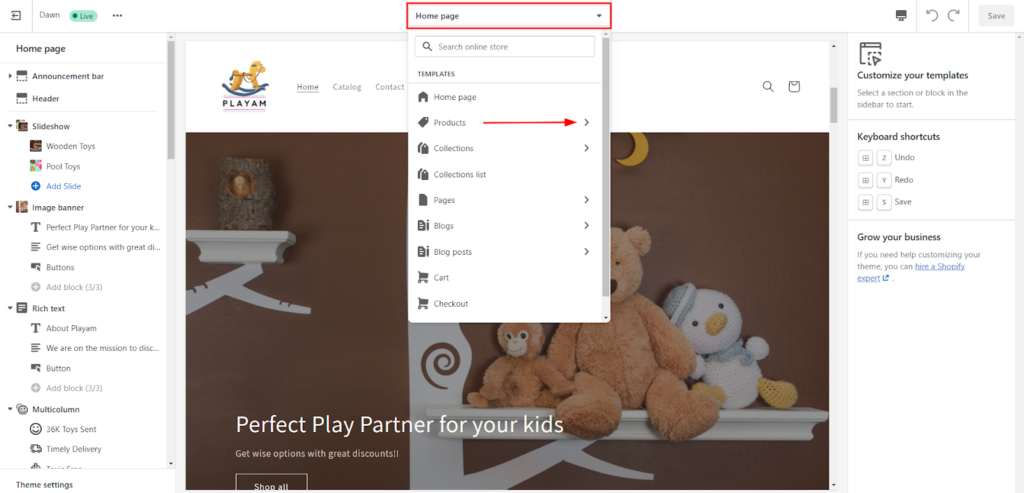
Step 2: Select the template to which you wish to link the metafield (from the dropdown menu). We’ll pick the “product” default template here.
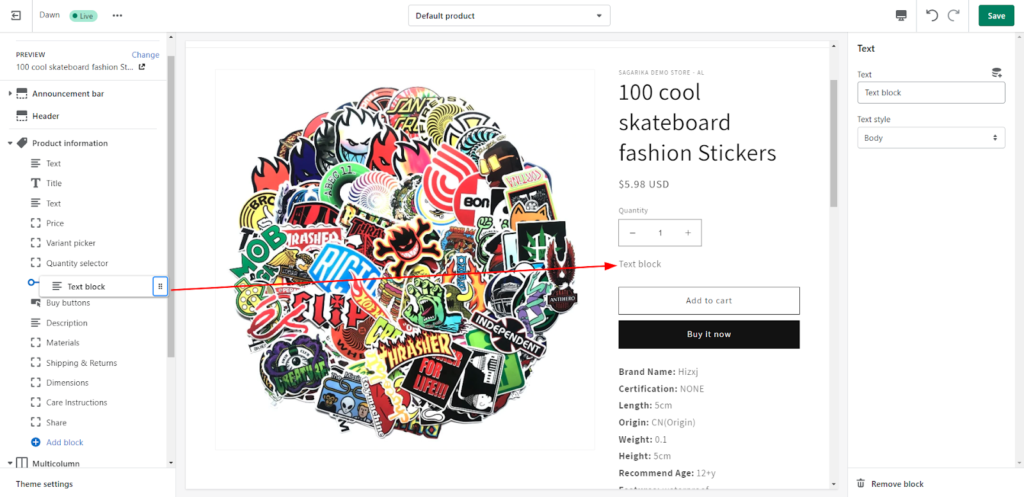
Step 3: Add a section or block to add the metafield. In the “Product Information” section, we’ll add a text block.
Step 4: Drag the newly added block or section to the place where you want the metafield data to appear. The text block will be placed beneath the quantity selector.
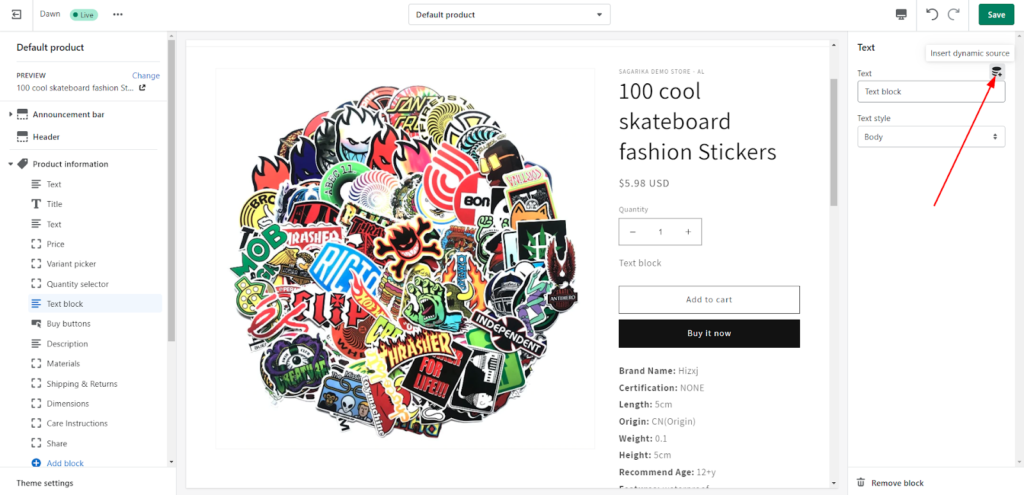
Step 5: Click the dynamic source icon to connect a dynamic source to Shopify section blocks
Step 6: Select the metafield you want to show here. We’ll pick the “Product Quantity” option that we just made.
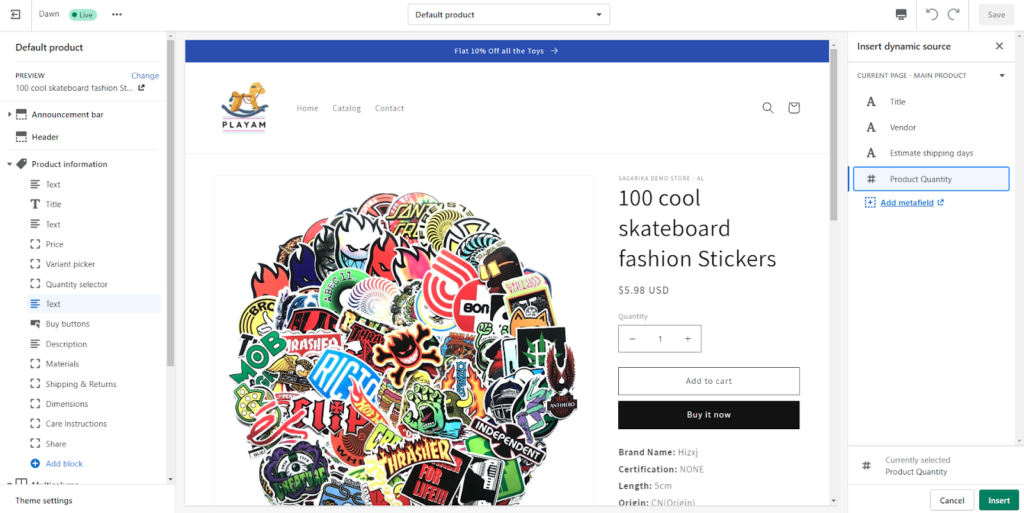
Step 7: After selecting the metafield, click the “Insert” button to insert dynamic source. This will show metafields on the product page.
Step 8: Now add some text to support the metafield value.

Step 9: Don’t forget to save your changes.
That’s all. This way you can connect your Shopify 2.0 metafields to your storefront. And with this, you have learned how to add Shopify 2.0 metafields to the store.
Read More: Shopify Landing Page: A Guide to Create a Landing Page that Converts
Wrap up!
The new Shopify 2.0 metafields are a major improvement over the previous version, and will greatly help store owners to make their stores more fully personalized and user-friendly. And the best part? You can add them to your store with just a few clicks, without having to change any code or do any complex configuration.
Well, if you’re the DIY type, we’ve made it possible for you to add metafields to your Shopify store and be in complete control over how they’re used. It’s up to you to build out the most useful metafields for your store—so don’t wait to get started!
If you are facing any difficulties in your Shopify store customization, feel free to contact our Shopify experts!