In the Google tag sectionAre you about to launch your online store on Shopify? It’s an exciting time, but before you hit that “launch” button, there’s one crucial step you need to take: integrate Google Analytics with your Shopify store.
On one hand, you might be thinking, “Do I really need another tool to track my website’s performance? I already have Shopify’s built-in analytics.” You’re right at some point. But, Google Analytics offers a wealth of data and insights that Shopify’s analytics simply can’t match.
Google Analytics is a powerful tool that helps you track and analyze the traffic on your website. One key step in achieving success is by integrating Google Analytics, specifically GA4, with your Shopify store before you launch.
In this blog post, we will dig into the benefits of using Google Analytics 4 in conjunction with Shopify’s built-in analytics. You will learn how GA4 can provide valuable insights into how visitors interact with your store, including information on:
- where they’re coming from,
- what pages they visit, and
- what products they’re interested in.
So let’s start with the basics!
What is Google Analytics 4?
Google Analytics 4 (GA4) is the latest version of Google’s web and app analytics platform. It utilizes machine learning and other advanced technologies to provide more comprehensive and accurate data insights for businesses.
GA4 also allows for more robust data privacy and security controls and provides greater flexibility in how data can be collected and analyzed. It includes features such as enhanced measurement capabilities, cross-device reporting, and automated insights.
Here are the frequently asked questions about Google Analytics and Shopify:
Does Google Analytics work with Shopify?
Yes, Google Analytics works with Shopify. Google Analytics is a web analytics service offered by Google that tracks and reports website traffic. Shopify is a popular eCommerce platform that allows users to create and manage an online store.
By integrating Google Analytics with Shopify, you can track the performance of your store and gain insights into your customers’ behavior and preferences.
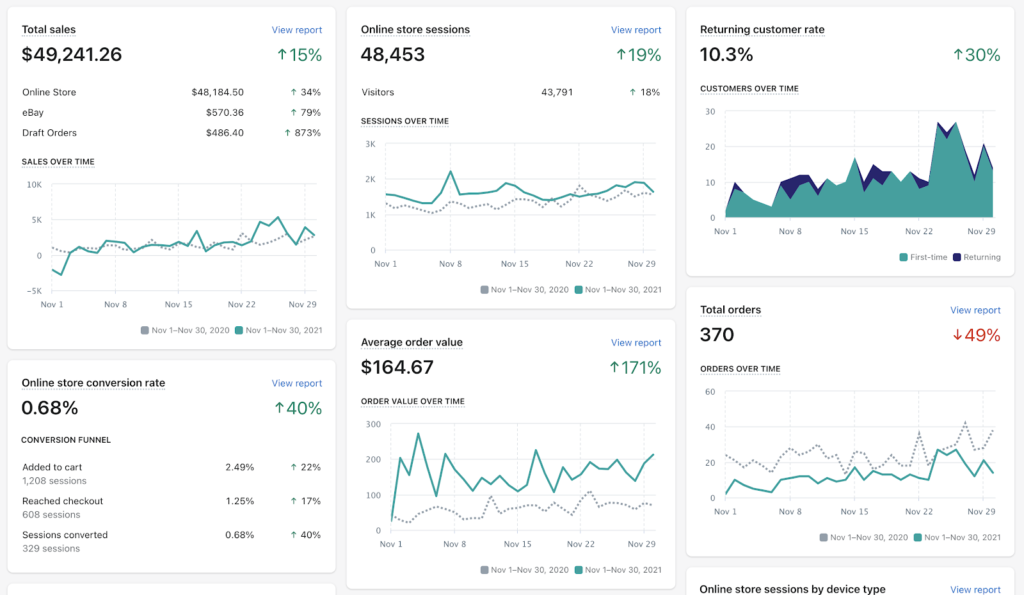
Should I use Shopify analytics or Google Analytics?
Both Shopify analytics and Google Analytics can be used to track your store’s performance, but Google Analytics offers more advanced features and is more customizable. Shopify analytics provides the actual sales data (transaction and revenue data), conversion rate, and basic data about site traffic.
This is how the Shopify analytics dashboard looks:
Source: Search Engine Journal
However, Google Analytics provides more detailed data such as demographics, user behavior, and eCommerce tracking. You can also use Google Analytics to create custom reports and track specific goals.
This is how the Google Analytics 4 dashboard looks:
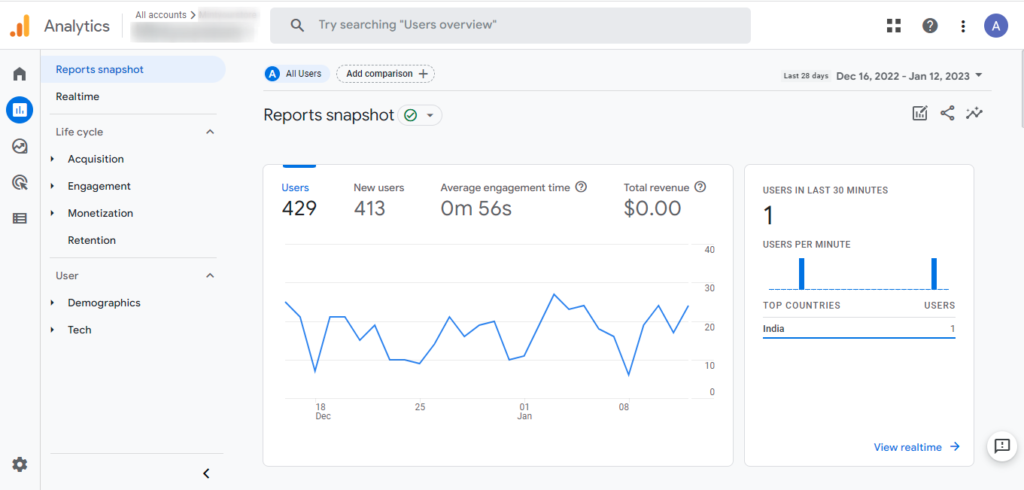
With Google Analytics enabled in your Shopify store, you can overcome the limitation of Shopify analytics of basic eCommerce tracking.
Is Google Analytics 4 compatible with Shopify?
Google Analytics 4 is compatible with Shopify. Google Analytics 4 is the latest version of Google Analytics, which offers more advanced features such as machine learning and improved data collection. It is fully compatible with Shopify and can be integrated using the same process as the previous version of Google Analytics.
What insights does Google analytics 4 offer for the Shopify store?
Google Analytics 4 offers a range of insights that can help store owners better understand and optimize their eCommerce performance.

Some of the key insights that Google Analytics 4 can provide for a Shopify store include:
- eCommerce Tracking: It allows tracking of revenue, transactions, and product performance, helping to understand which products are popular and which are not.
- Audience Insights: It provides demographic information about website visitors, such as age, gender, and interests, which can be used to segment audiences and create targeted marketing campaigns.
- Funnel Analysis: Google Analytics 4 can track the customer journey, from product discovery to purchase, and help identify any drop-off points in the process.
- Conversion Rate Optimization: It provides insights into the conversion rate, and how different elements of the website affect it, such as the layout, the color scheme, and the placement of the call to action.
- Retargeting: It integrates with Google Ads and can be used to create retargeting campaigns that target users who have previously visited the website but have not yet made a purchase.
- Real-time monitoring: It gives you real-time monitoring of website traffic and eCommerce transactions, allowing businesses to quickly respond to changes in visitor behavior.
- Cross-device and cross-platform tracking: It can track user interactions across multiple devices and platforms, helping businesses understand how their customers interact with their websites and apps.
With this information, you can make data-driven decisions to improve your store’s performance and increase your sales.
So, integrating Google Analytics, specifically GA4, with your Shopify store is an essential step towards creating a successful online business. Don’t wait until after you’ve launched your store to set it up. Do it now and you’ll have a valuable resource at your fingertips, helping you make better business decisions and increasing your sales.
By using both Shopify and GA4 analytics, you’ll be able to have a comprehensive view of your store performance and make informed decisions.
Let’s learn how to enable google analytics in your Shopify store.
How to Connect Google Analytics 4 to Shopify?
Here are the steps for connecting Google Analytics 4 to Shopify:
STEP 1: Create a Google Account
In order to use Google Analytics, you’ll need to have a Google account. If you don’t already have one, you can create one by going to the Google Sign Up page and following the prompts.
Enter your name, email address, and choose a password. Complete the Google Sign-Up process!

If you’re using your existing google or Gmail account, please skip this step!
STEP 2: Google Analytics account Setup & Create a Google Analytics 4 property
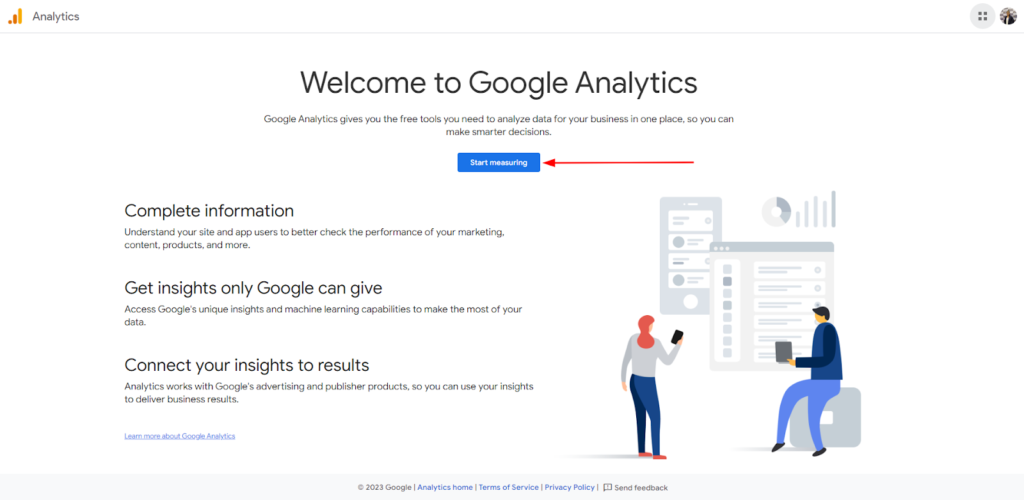
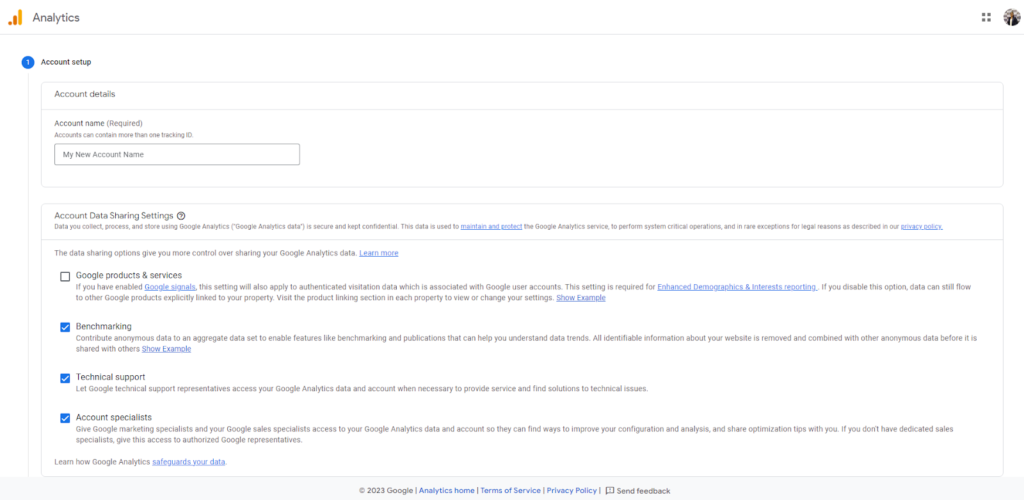
After you have a Google account, now you can set up a Google Analytics account. Open Google Analytics and click on the “Start measuring” button.
Enter the account details, select the Account Data Sharing Settings, scroll down and click on the “Next” button.
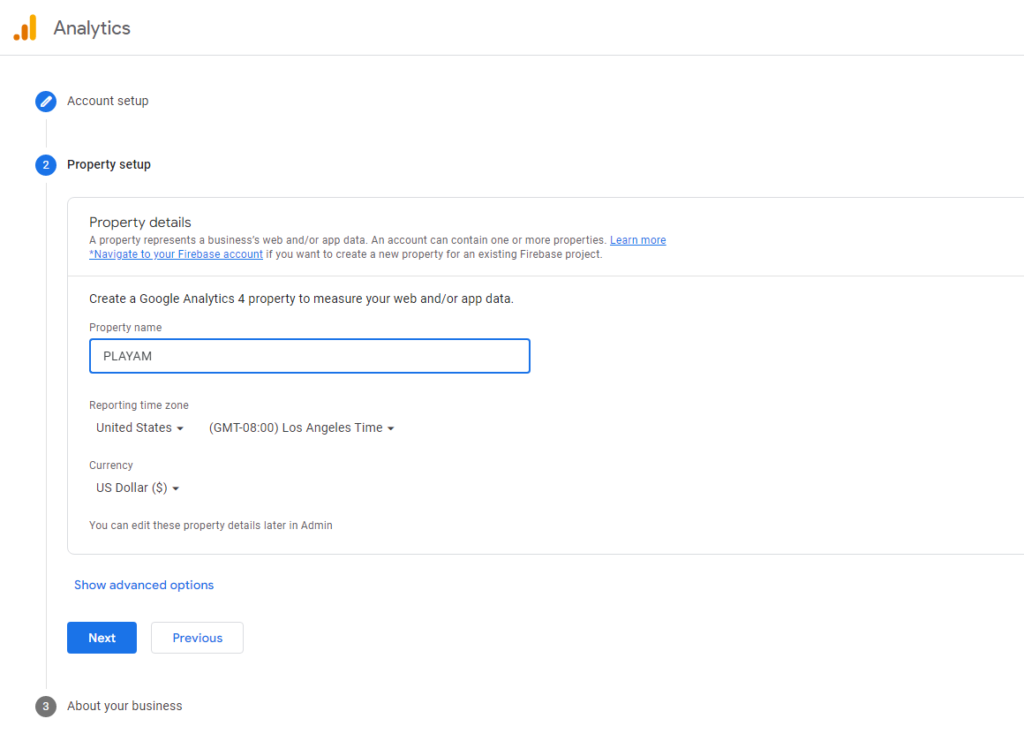
Next, add the property details to create a Google Analytics 4 property for your Shopify store. Click “Next” once done.
So the last step in setting up a google analytics account is “Business information”. Add the details about your eCommerce business and hit the “Create” button.
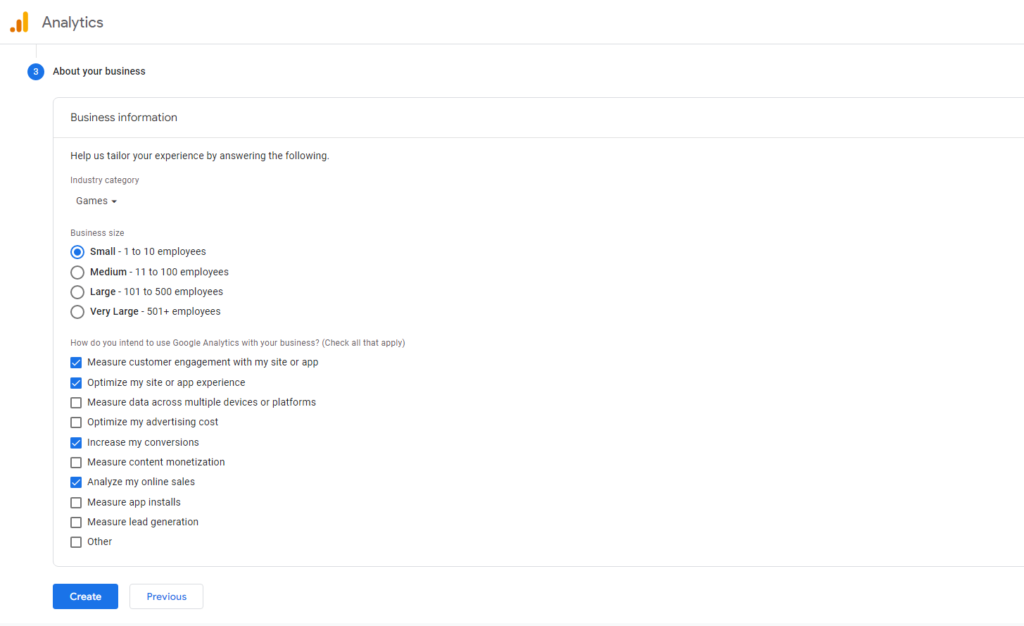
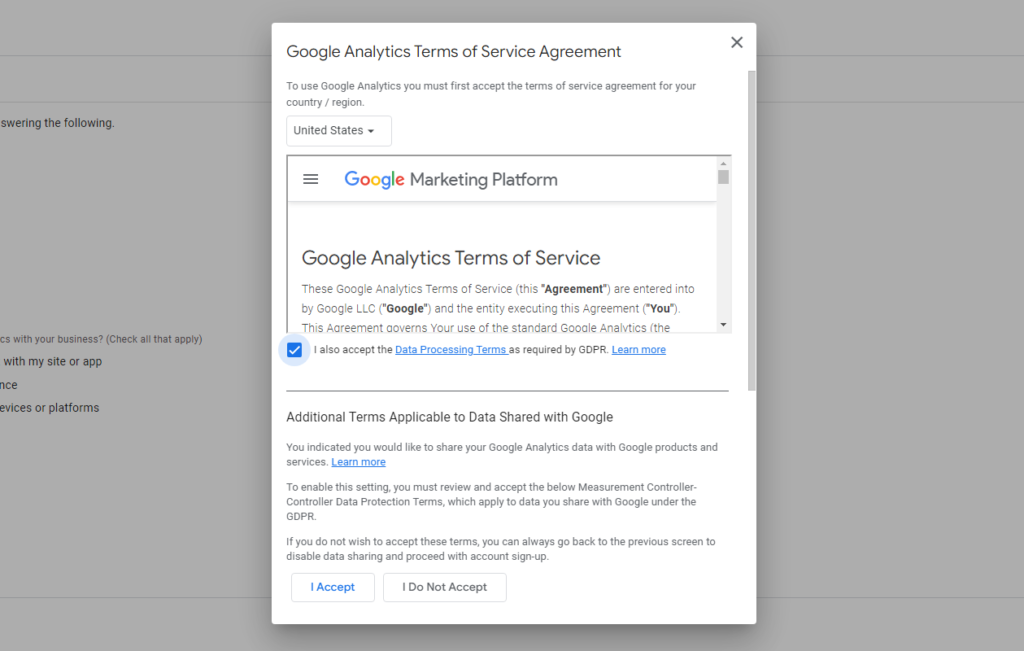
You’ll be prompted to the Google Analytics terms of service agreement. Read the agreement carefully, select the checkbox and click the “I Accept” button.
This will create your Google Analytics account as well as add a Google Analytics 4 property to your account.
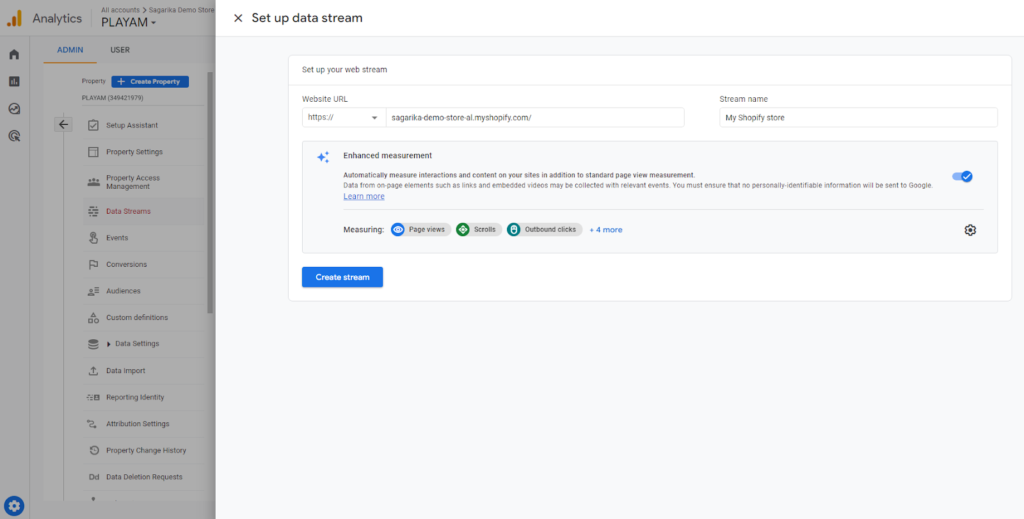
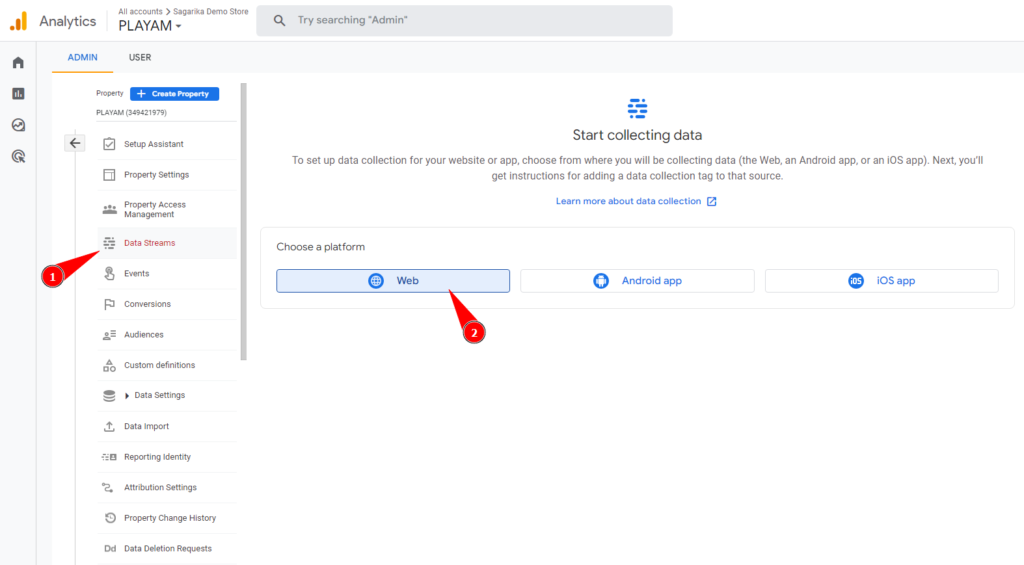
STEP 3: Add a data stream
To collect data for your Shopify store, you need to set up a data collection source.
In the property you just created, go to the “Data Streams” tab and select “Web”.
Now enter your Shopify store’s URL in the “Website URL” in a way it doesn’t include “https://” in the URL as shown in the picture below.
Add your “Stream name”. Keep the Enhanced measurement settings as it is and lastly click “Create Stream”.

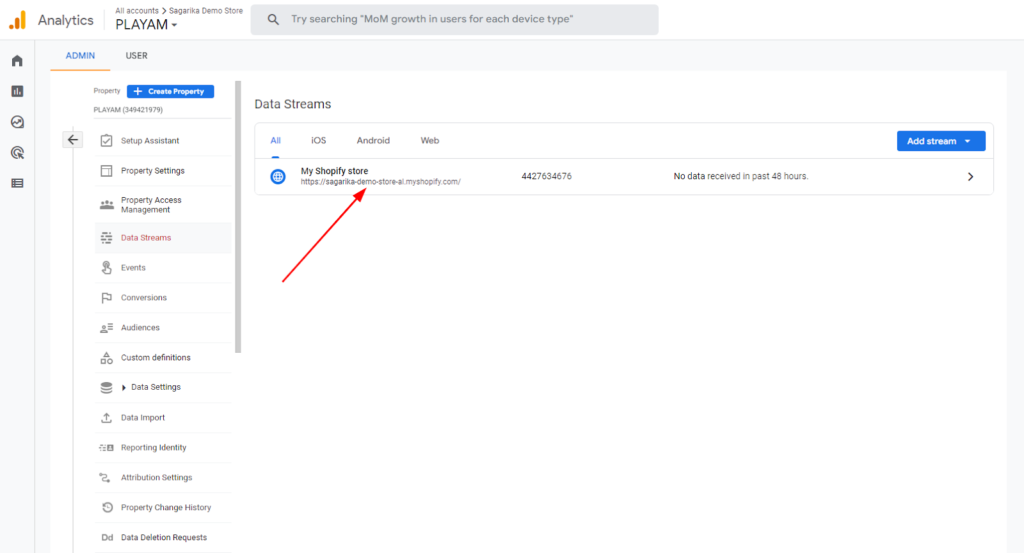
The newly created data stream will look like this in the Data Stream of your property.
STEP 5: Add Google analytics code for Shopify store
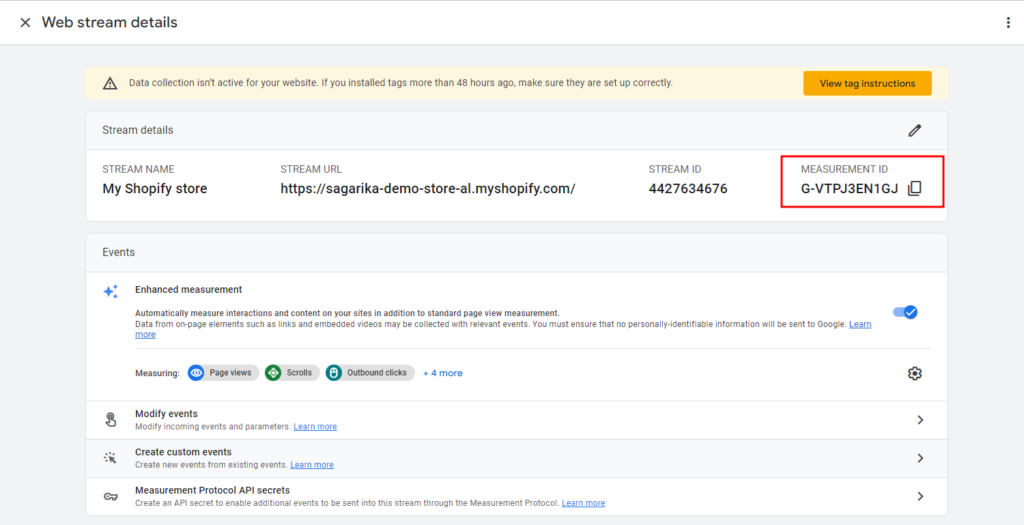
Once your data stream is set up, you will receive a Google Analytics tracking code also known as “G-” ID that will help you setup Google Analytics data collection for your eCommerce site.
Click on the newly created data stream to open it. You will find the code at the top right corner of the screen.
Now let’s add Google Analytics tracking tag to complete the setup process of website data collection.
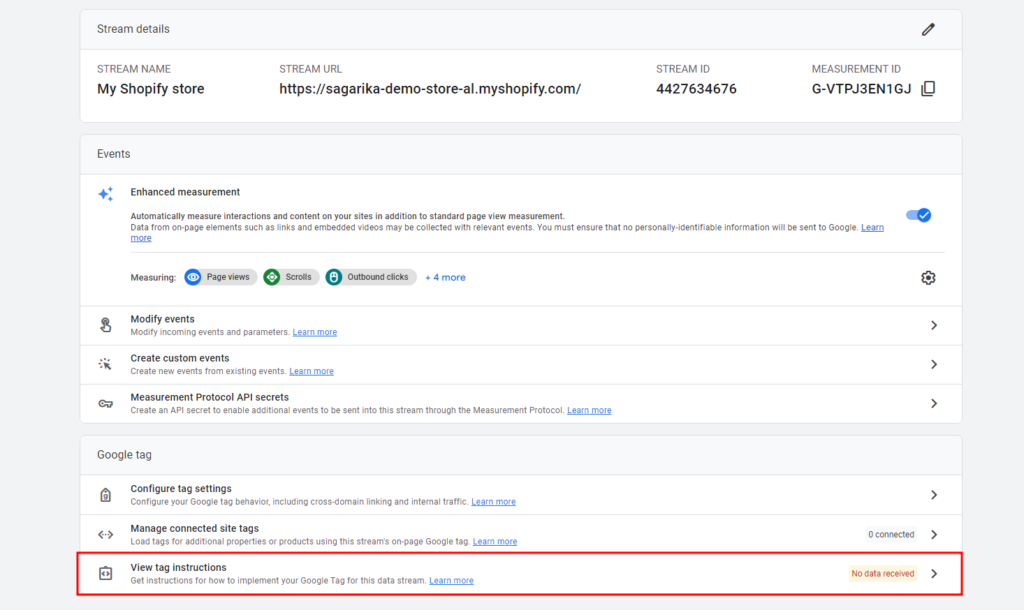
For that, click the View tag instruction to open the “Installation instructions” box.
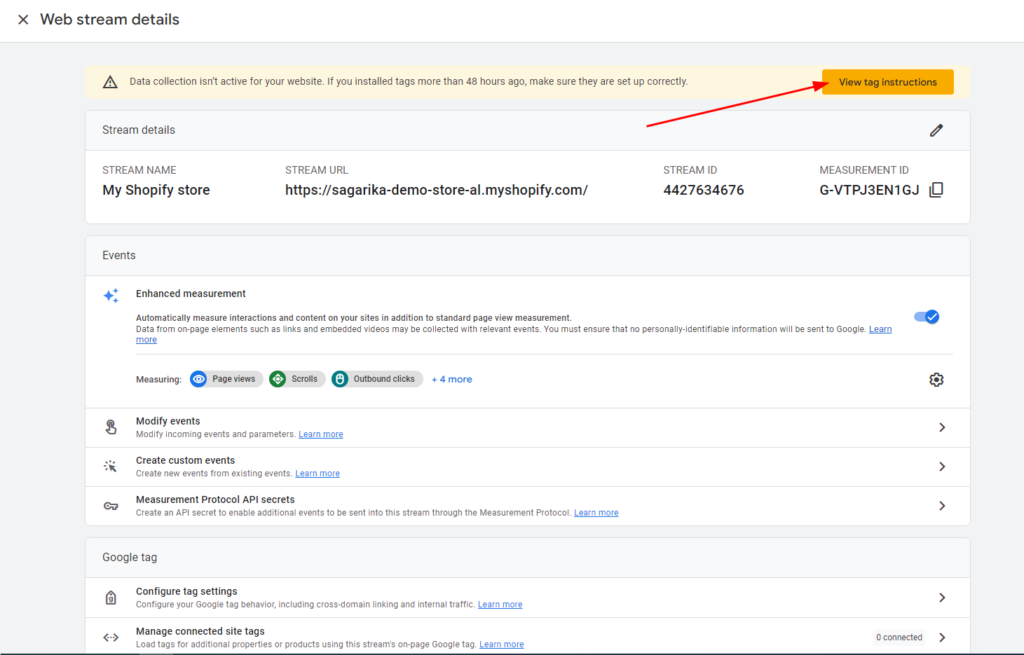
If this option is not available for you, you can scroll down and open it through View tag instruction in the Google tag section.
In the Installation instructions, you will get two options to install your Google tag. To connect Google Analytics to Shopify store, you need to choose the “Install manually” option.
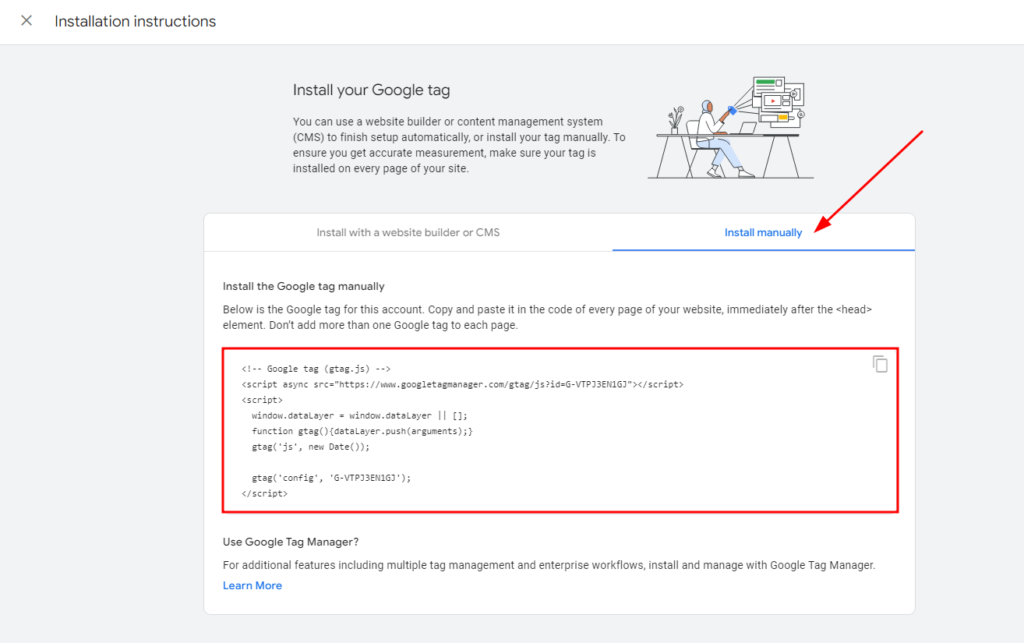
Now, copy this Google Analytics tracking code and go to your Shopify store.
In the Shopify admin, go to Online Store > Themes, and select the current theme of your store.
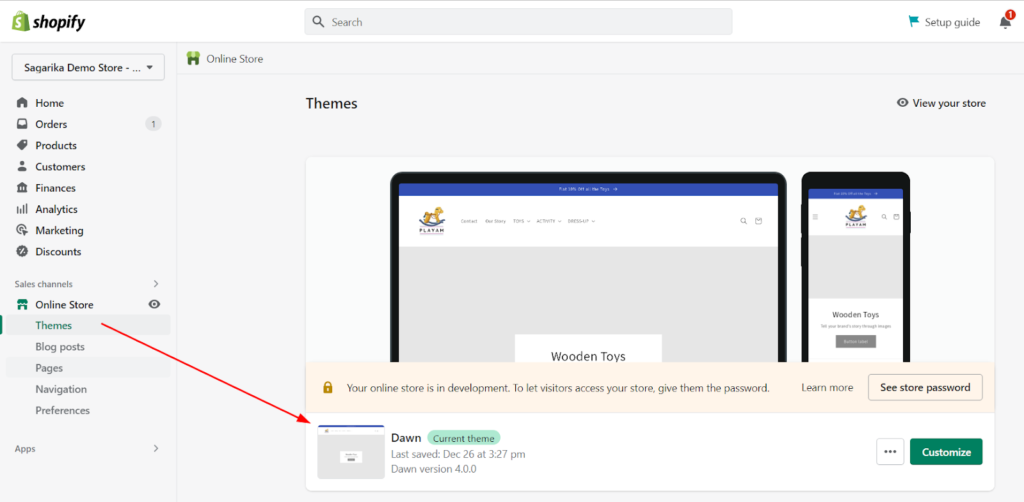
Click on Actions and select “Edit Code”.
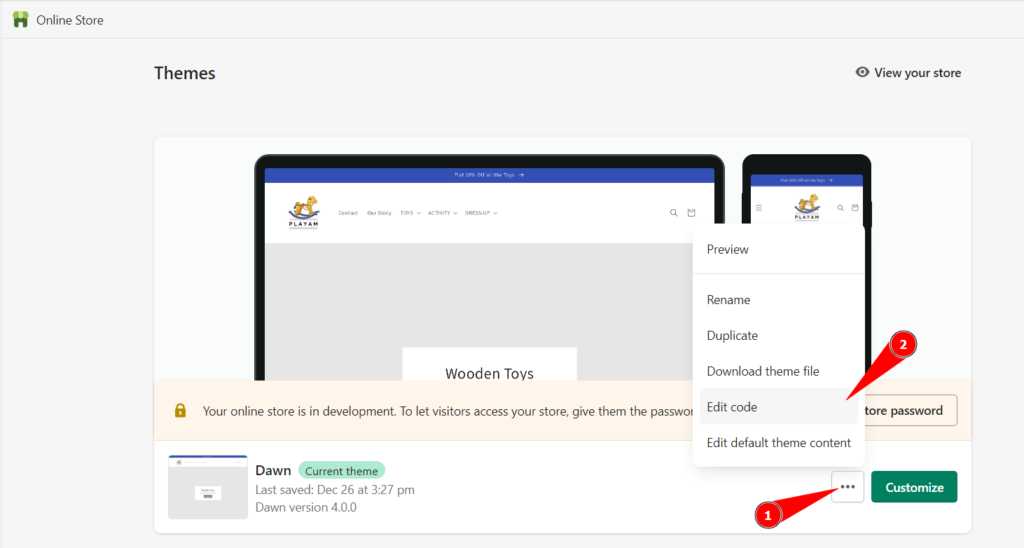
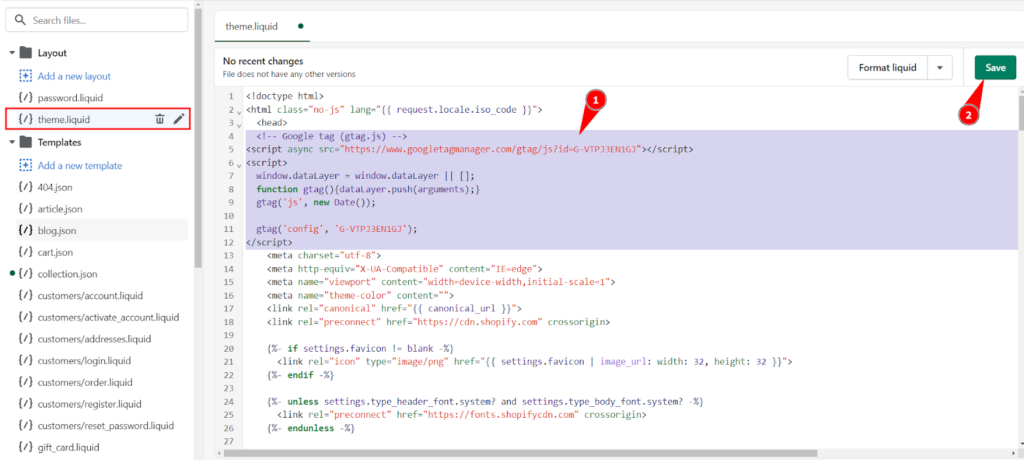
In the “Layout” folder, find the “theme.liquid” file and make sure there are no Google tracking tags already added to the code.
Also check if any additional google analytics javascript (ga.js, gtag.js, or analytics.js) files are listed. Before making any changes, make sure the tag installation is accurate.
If you don’t find any existing tracking code or file, paste the Google Analytics 4 tracking code either immediately after the <head> tag or just before the closing </head> tag. Click “Save”!
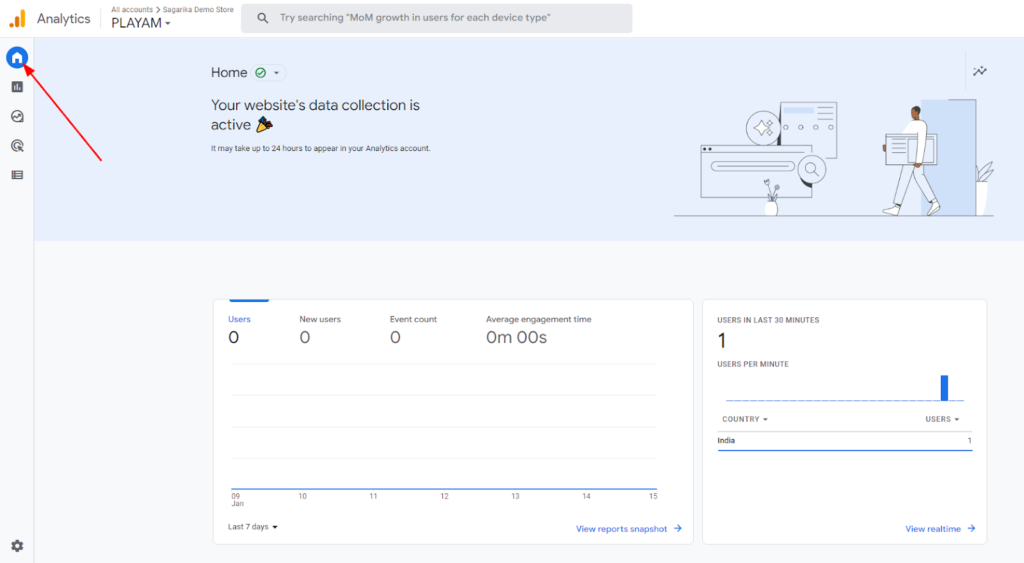
Go to “Home” in Google analytics. You’ll find a success message “Your website’s data collection is active” as shown in the picture below. This means you’ve successfully enabled Google Analytics in your online store.
STEP 6: Adding GA4 code to your order confirmation page
To track order information, you will need to add the GA4 tracking code to your order confirmation page.
In your Shopify admin, go to Settings > Checkout and accounts.
Scroll down to the “Order status page” section and paste the below code into the Additional scripts field.
<!-- Global site tag (gtag.js) - Google Analytics -->
<script async src="https://www.googletagmanager.com/gtag/js?id=G-CODE"></script>
<script>
window.dataLayer = window.dataLayer || [];
function gtag(){
    dataLayer.push(arguments);}
    gtag('js', new Date());
gtag('config', 'G-CODE');
{% if first_time_accessed %}
     gtag("event", "purchase", {
     transaction_id: "{{ order.order_number }}",
     value: {{ total_price | times: 0.01 }},
     tax: {{ tax_price | times: 0.01 }},
     shipping: {{ shipping_price | times: 0.01 }},
     currency: "{{ order.currency }}",
     items: [
       {% for line_item in line_items %}
       {
           item_id: "{{ line_item.product_id }}",
           item_name: "{{ line_item.title | remove: "'" | remove: '"' }}",
           currency: "{{ order.currency }}",
           price: {{ line_item.original_price | times: 0.01 }},
           quantity: {{ line_item.quantity }}
       },
       {% endfor %}
    ]
});
{% endif %}
</script>
Here, the below script consist of two “G-CODE”. Replace the “G-CODE” with your Google analytics tracking code “G-” ID code.
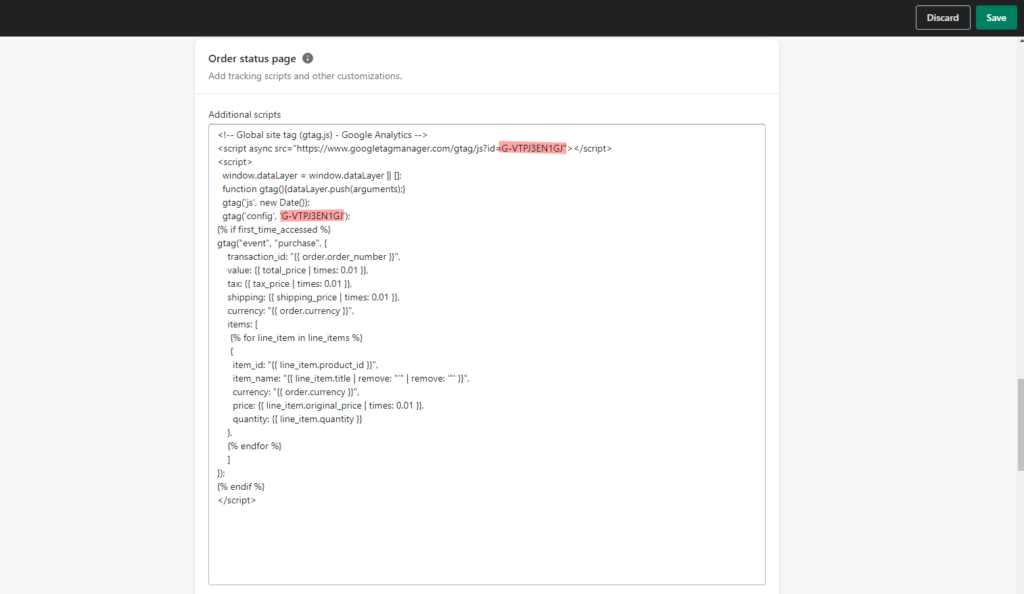
Now, save the changes once you added the google analytics tracking code.
By doing this, you can send GA4 information about a transaction, such as the products and the total cost of the purchase.
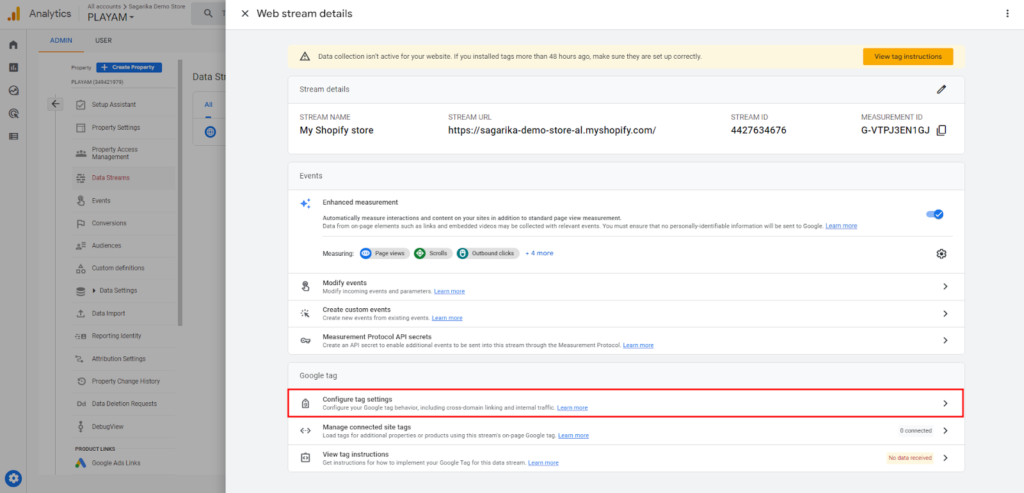
STEP 7: Prevent Shopify referrals in GA4
By default, Shopify will be included in your referral data. To prevent this, you will need to set up a referral exclusion in your GA4 property.
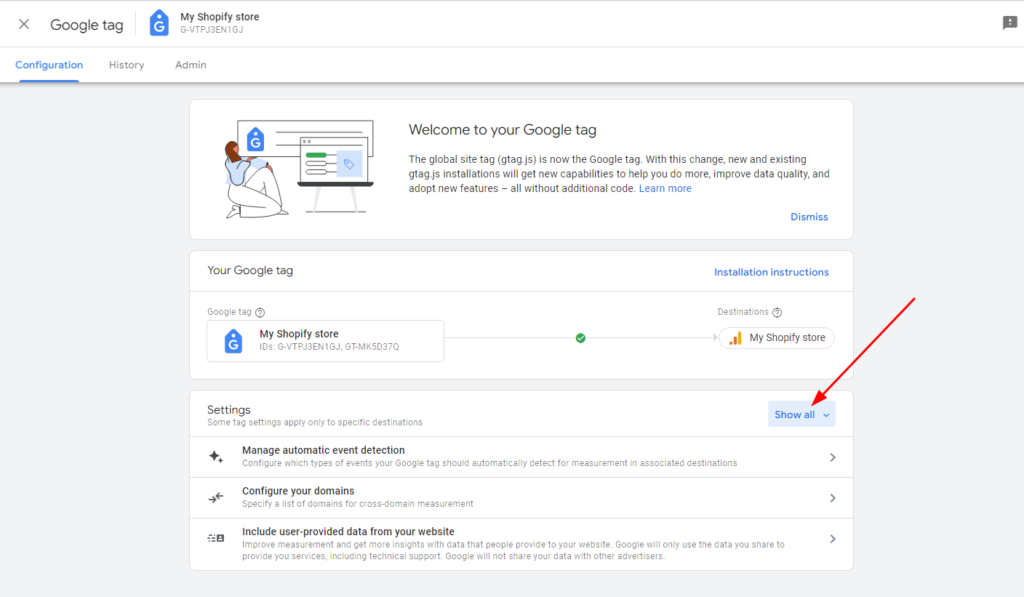
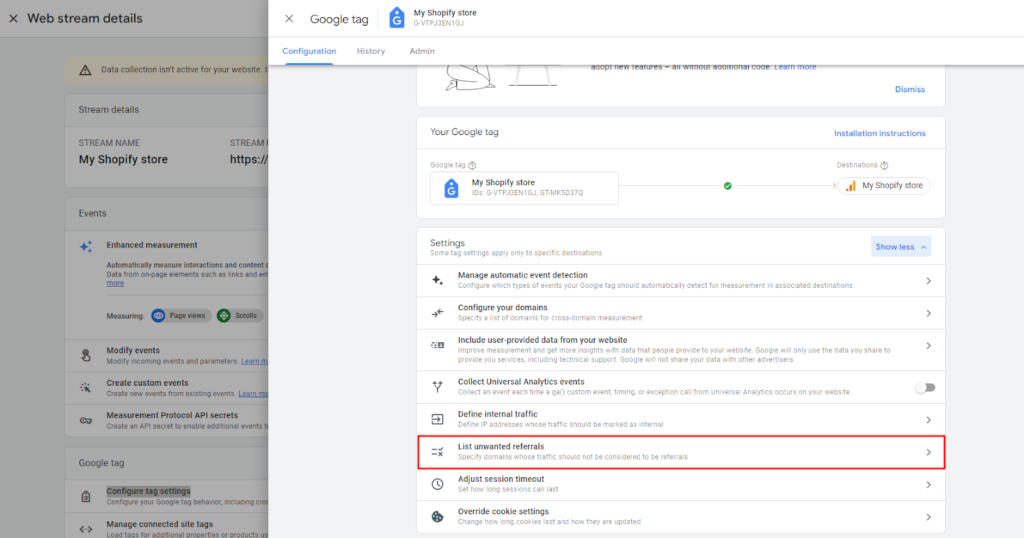
In the GA4 property, go to the Data Stream section, and open your newly created data stream for your Shopify store. Select Configure tag settings in the Google tag section.
In the Configuration tab, click on the “Show all” to find more tagging related options.
Click on the List unwanted referrals option.
Then in the Configuration, add “myshopify.com” in the field.
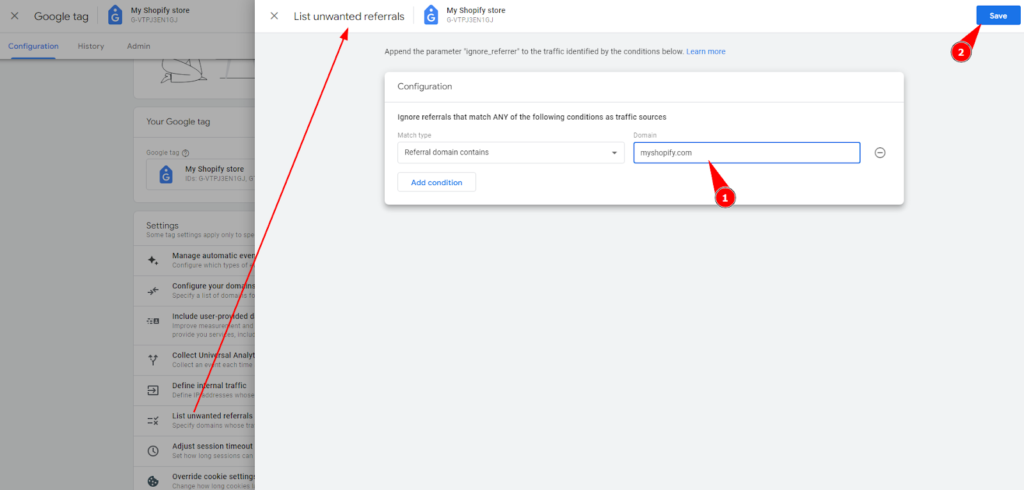
As a result, when customers check out and view the confirmation page, the checkout pages won’t appear in our reports as self-referrals.
Congratulation!! You’ve successfully installed Google Analytics to your Shopify store.
The data source may take 48 hours to activate data collection. Once it’s activated, you can get all the key metrics from your Shopify website tracking.
Let’s see how the dashboard will look after you’ve enabled Google Analytics 4 in your online store.
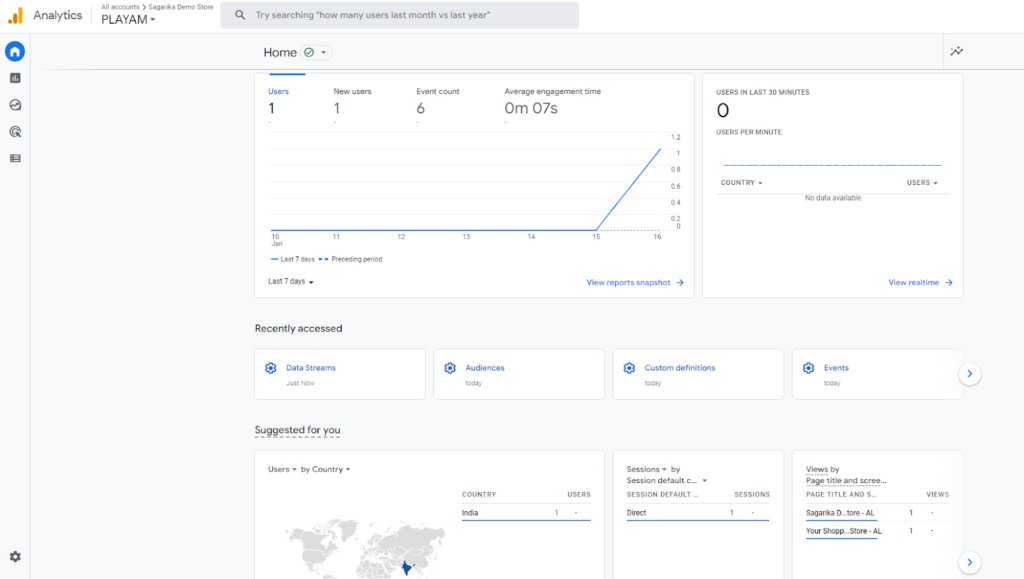
So, this is how a Shopify merchant can newly set up Google Analytics 4 in their online store. But for the store owners who are currently using Universal Analytics (older version of Google analytics), they need to migrate from UA to GA4 before July 1, 2023 (when Google Analytics 4 will completely replace Universal Analytics).
Let’s see how to switch from UA to GA4.
How to switch from UA to GA4?
Here are the steps to switch from Google Analytics (GA) to GA4:
STEP 1: Create a GA4 property in your Google Analytics account. This will give you a GA4 tracking code, which you will need to implement on your website.
STEP 2: Install the GA4 tracking code on your website, replacing the existing GA tracking code. This will ensure that data is being collected by GA4, not GA.
STEP 3: Set up GA4 events on your website. GA4 uses events to track user interactions, so you’ll need to set up events for things like button clicks, page views, and form submissions.
STEP 4: Configure your GA4 property settings. This includes setting up data streams, creating custom dimensions and metrics, and configuring data sharing and retention settings.
STEP 5: Test your GA4 implementation. Verify that data is being collected correctly and that events are being recorded properly.
STEP 6: Migrate your GA data to GA4. Google provides a tool to import your GA data into GA4.
STEP 7: Optionally you can use GA4 features like enhanced measurement, cross-device tracking, and app+web property.
STEP 8: Finally, monitor your GA4 data and make any necessary adjustments to your implementation or event tracking.
Please note that, It is always best practice to have a back-up of all your data and it’s recommended to keep your GA running for a while to compare the data of both GA and GA4.
Now the next most improtant thing after connecting Google analytics with your Shopify store is to set up Google Analytics events for actual eCommerce tracking.
Let’s learn more in the next section.
Google Analytics Events for eCommerce Tracking

Tracking your eCommerce performance is like a treasure hunt, and Google Analytics events are the map to your treasure chest. These events allow you to track important actions on your website, such as product views, add to cart, and purchase completions.
Here is a list of recommended events for eCommerce tracking available in Google analytics 4:
1. add_payment_info
This event tracks when a user submits their payment information during the checkout process. This event can be used to track how many users are abandoning their cart due to issues with payment.
For example, the store visitor finds the perfect pair of shoes, add it to their cart, and proceed to checkout. They fill in their shipping address, and then they reach the payment page.
As soon as they submit their payment information and click on the “Pay” button, this event is triggered and recorded.
2. add_shipping_info
This event tracks when a user submits their shipping information during the checkout process. This event can be used to track how many users are abandoning their cart due to issues with shipping options.
For example, a customer is browsing through your online store and they find the perfect dress. They add it to their cart, and proceed to checkout. They reach the shipping page, fill in their address and click on the “continue” button, this event is triggered and recorded.
3. add_to_cart
This event tracks when a user adds items to their cart. This event can be used to track which products are the most popular among users and which are being added to carts the most.
For example, a customer is browsing through your online store and they find the perfect camera. They click on the “Add to cart” button and this event is triggered and recorded.
4. add_to_wishlist
This event tracks when a user adds items to their wishlist. This event can be used to track which products are the most popular among users and which are being added to wishlists the most.
For example, a customer find the laptop in your online store. They like it and want to save it for their next purchase. So when they click on the “Add to wishlist” button and this event is triggered and recorded.
5. begin_checkout
This event tracks when a user begins the checkout process. This event can be used to track how many users are abandoning their cart at the checkout stage.
For example, imagine a customer is browsing through your online store and they’ve added items to their cart. Then they click on the “checkout” button, this event is triggered and recorded.
6. generate_lead
This event tracks when a user submits a form or a request for information. You can use this event to track the number of users who show interest in your products or services, providing valuable insights into customer engagement.
For example, a customer finds a service they are interested in and wants more information, so they fill out a request form, which triggers and records this event.
7. purchase
This event tracks when a store visitor completes a purchase. This event can be used to track how many users are completing a purchase and how much revenue is being generated.
For example, a customer found the perfect product in your online store. They place the order and redirected to the order confirmation or thank you page. At that time, this event is triggered and recorded.
8. refund
This event tracks when a customer proceeds for refund. This event can be used to track how many users are requesting refunds and why.
For example, a customer made a purchase in your store. But after receiving the product, they realize it’s not what they wanted and they initiate a refund. This event is triggered and recorded.
9. remove_from_cart
This event tracks when a user removes items from their cart. This event can be used to track which products are being removed from carts the most and why.
For example, a customer adds items to their cart and after some time realizes that one of the items is not what they want, so they click on the “Remove” button next to the item. At that time this event is triggered and recorded.
10. select_item
This event tracks when a user selects an item from a list. This event can be used to track which products are the most popular among users and which are being selected the most.
For example, a customer is viewing a list of recommended products. They click on one of the products and this event is triggered and recorded.
11. select_promotion
This event tracks when a user selects a promotion. This event can be used to track which promotions are the most successful among users.
For example, a customer is browsing through your online store and they see a promotional banner for a sale. They click on the banner and this event is triggered and recorded.
12. view_cart
This event tracks when a user views their cart. This event can be used to track how many users are viewing their cart and how many are completing a purchase.
For example, a shopper adds products to their cart and then click on the “View cart” button to see the items they’ve added and this event is triggered and recorded.
13. view_item
This event tracks when a user views an item. You can use this event to track which products users view the most and which are the most popular.
For example, a store visitor finds a product they like. They click on the product to view its details, and the system triggers and records this event.
14. view_item_list
This event tracks when a user views a list of items. You can use this event to track which products users view most and which are the most popular.
For example, a customer browses your online store and clicks on a category link to view its products, triggering and recording this event.
15. view_promotion
This event tracks when a user views a promotion. This event can be used to track which promotions are attracting most of the users.
For example, a customer is browsing through your online store and they see a banner ad for a sale. They view the details of the promotion and this event is triggered and recorded.
How to Utilize Google Analytics 4 Data for Store Optimization
Google Analytics 4 provides a wealth of data that can be used to optimize your online store. You must know the best ways to get most out of it to optimize your Shopify store.

Let’s see how to optimize your online store using Google analytics 4 data!
Identifying Traffic Sources
Understanding where your website traffic comes from helps you determine which marketing strategies work and which ones need tweaking.
By using the acquisition reports in Google Analytics 4, you can see the breakdown of where your traffic is coming from, whether it’s from search engines, social media, referral websites, or direct traffic.
This information can help you allocate your marketing budget more effectively and focus on the channels that are driving the most conversions.
Tracking Conversion Rates
Conversion rates are a measure of how well your website is performing in terms of driving sales or other desired actions. By tracking conversion rates, you can see which pages on your website are performing well and which ones may need improvement.
The conversion reports in Google Analytics 4 allow you to track key metrics such as purchase conversion rate, lead generation conversion rate, and more.
Analyzing Product Performance
Identifying which products are performing well and which ones may need improvement can help you boost your sales and store revenue.
The eCommerce reports in Google Analytics 4 allow you to see detailed information about your products, such as which ones are getting the most views, which ones are generating the most sales, and which ones have the highest return rate.
Monitoring Site Behavior
This information can help you identify problem areas on your website, such as slow-loading pages or confusing navigation, and make the necessary changes.
Using Custom Dimensions and Metrics
Custom dimensions and metrics allow you to track specific data points that are important to your business. For example, you could create a custom dimension to track the type of device that users are using to access your website, or a custom metric to track the average purchase value.
By using custom dimensions and metrics, you can gain a deeper understanding of your website’s performance and make data-driven decisions to improve it.
Regularly Reviewing and Acting on the Data
It’s important to set aside time on a regular basis to review your analytics data and identify areas for improvement. You can do this weekly, monthly, or quarterly depending on the size of your business.
Once you’ve identified areas for improvement, it’s important to take action and make the necessary changes. This could be something as simple as updating the copy on a particular page or something more complex like redesigning a section of your website.
The key is to continuously monitor and make data-driven decisions to improve your website’s performance and drive more conversions.
Wrapping Up!
Well folks, it’s been a pleasure walking you through the process of integrating Google Analytics with your Shopify store. I hope you found it helpful and informative!
To sum up, adding Google Analytics to your Shopify store is a great way to get a better understanding of your customers, track key metrics like traffic sources, conversion rates, and e-commerce data, and make data-driven decisions to improve your store and drive sales.
You can do this weekly, monthly, or quarterly depending on the size of your business.
If you’re not confortable adding google analytics to your Shopify store alone, our Shopify team can help you out! You can quickly connect to our Shopify Experts and they can make the integration process a breeze.
In short, integrating Google Analytics with your Shopify store is a crucial step in launching a successful Shopify store. Check whether you missed anything else from the Shopify store setup checklist before you make your store live for your shoppers.
And as always, if you have any questions or need any help, just let me know!